
They've been on regular rotation on Aussie dinner menus for years. This Homemade Rissoles Recipe highlights why their popularity has endured – helping you create tender, flavour-packed rissoles that will have everyone asking for more!
Jump to:
An Aussie icon
Rissoles have their origins in France and have evolved into various forms throughout the world – usually coated in breadcrumbs or encased in pastry.
In Australia, we've stripped them back to a naked form – no coating at all! But they've become something that's a bit more than just a meal.
Rissoles have become embedded in Australian culture. They're part of the way we talk – "See you round like a rissole" (that's "see you later").
"The Castle," an Australian cinematic gem from 1997, introduced us to the Kerrigan family. The family captured the idea of the "little Aussie battler" and it may be the most widely quoted Australian film ever, with so many one liners we still love to roll out today. "How's the serenity?"
It also feature this hilarious rissole-themed exchange at the dinner table:
Darryl Kerrigan: “Aw, this is beautiful darl. What’dya call these things again?”
Sal Kerrigan: "Rissoles. Everybody cooks rissoles darl."
Darryl Kerrigan: "Yeah but it’s what you do with them.”
It's funny but true!
And I'm going to tell you exactly what you need to do with them to create the best ever Aussie rissoles. A rissoles recipe that'll go straight to the pool room!
The recipe
If you've ever had a not-so-great rissole experience, it's enough to turn you off them for years. Perhaps even forever.
But I've done the research to make sure this recipe will turn a person who's had the worst possible rissole experience into a rissole lover for life.
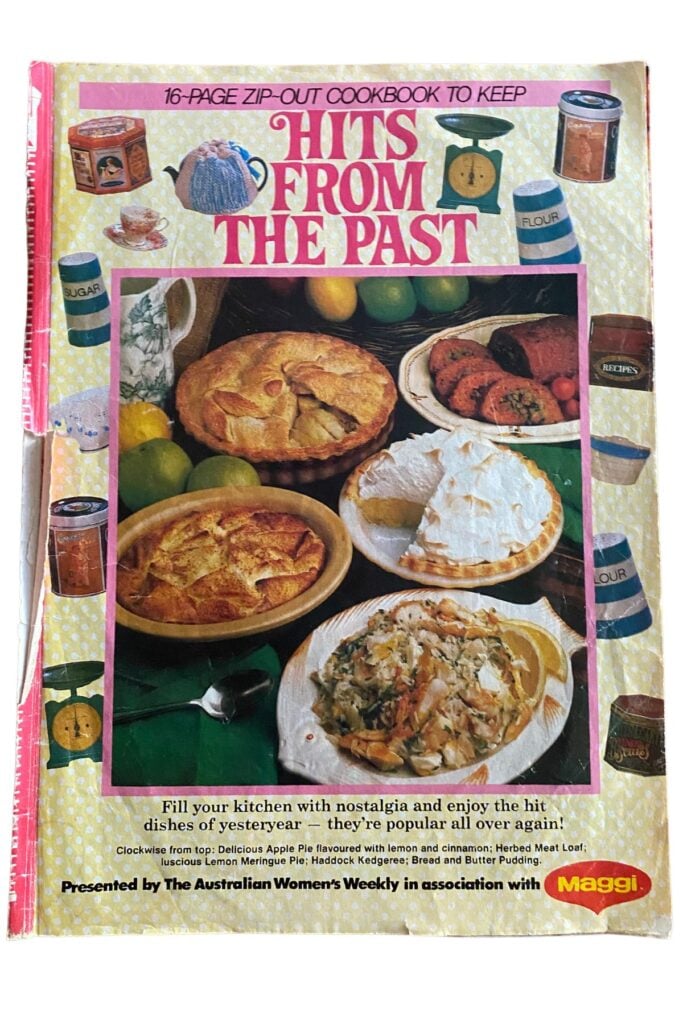
I started with a "Favourite Rissoles" recipe, published in this handy little "zip-out cookbook to keep" from 1984, pictured below. Whoever zipped out this copy did indeed keep it... and nearly 40 years later I'm still keeping it.
I looked at many other popular beef rissoles recipes, in old cookbooks and around the web, but ended up coming back to this "Favourite Rissoles" recipe and tweaking it just a little to come up with my version.
And, remember, "it's what you do with them" that's the secret.
And I'm going to tell you what to do with them, what you put into them, how to cook them, what you cook them in and what goes great with them!
Ingredient notes
This list will help you know what you'll need to add to the shopping list ahead of rissoles night.
You'll find the ingredient quantities at the end of the post in the recipe card.
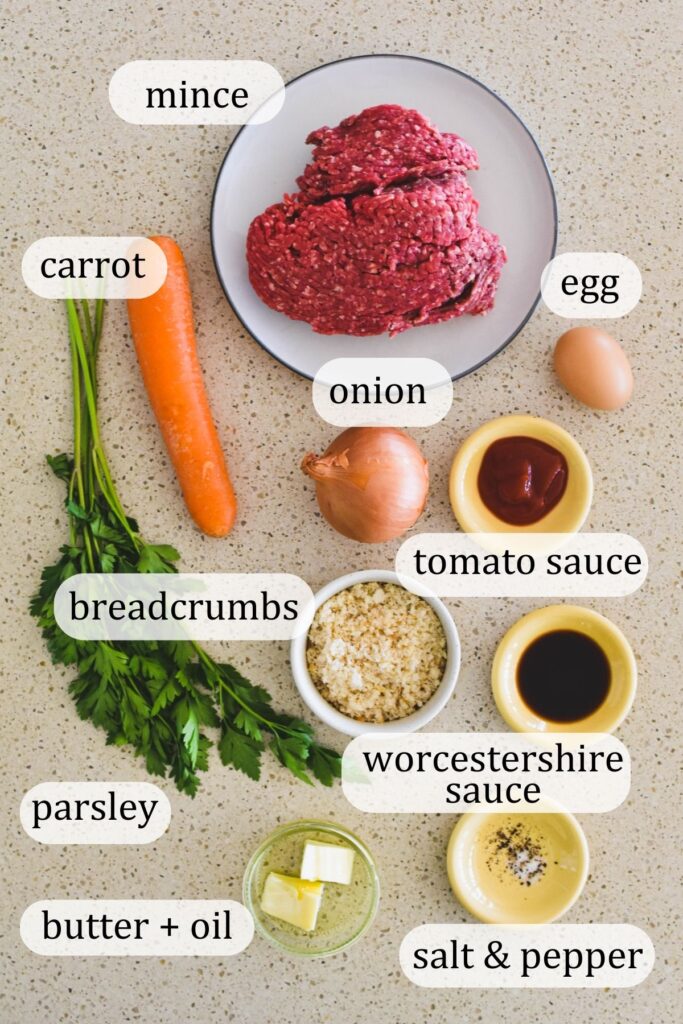
- beef mince (ground beef)
- onion
- fresh breadcrumbs (whizz up a few slices of day old white bread and, yes, you can use store-bought breadcrumbs as an alternative)
- carrot
- egg
- chopped parsley (preferably fresh, but you can use dried parsley if that's all you have)
- tomato sauce (that's ketchup in some parts)
- Worcestershire sauce (leave out the parsley if you want, leave out the tomato sauce, but I reckon this ingredient is ESSENTIAL)
- salt and pepper
- butter AND oil (to fry the rissoles in).
Equipment
To cook rissoles, you want a heavy-based frypan.
Why? Heavy-bottomed pans are thicker at the base, and tend to absorb and distribute heat from the stovetop better than a thinner pan.
You can, of course, also cook them on the BBQ – another popular option.
BLAST FROM THE PAST: Growing up, I remember mum making rissoles in the electric frypan. Remember those? You can still find them in some kitchens, but in the 80s I reckon they were in 99% of Aussie kitchens.
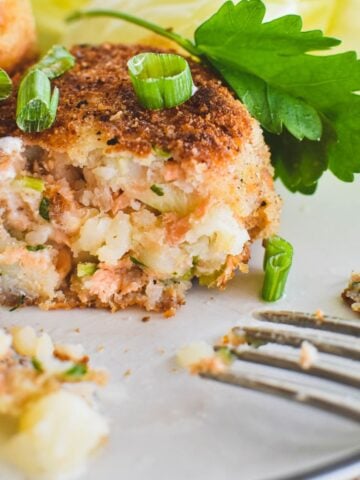
How to make Rissoles
Okay, so you've got the ingredients and selected a frypan.
Let's roll
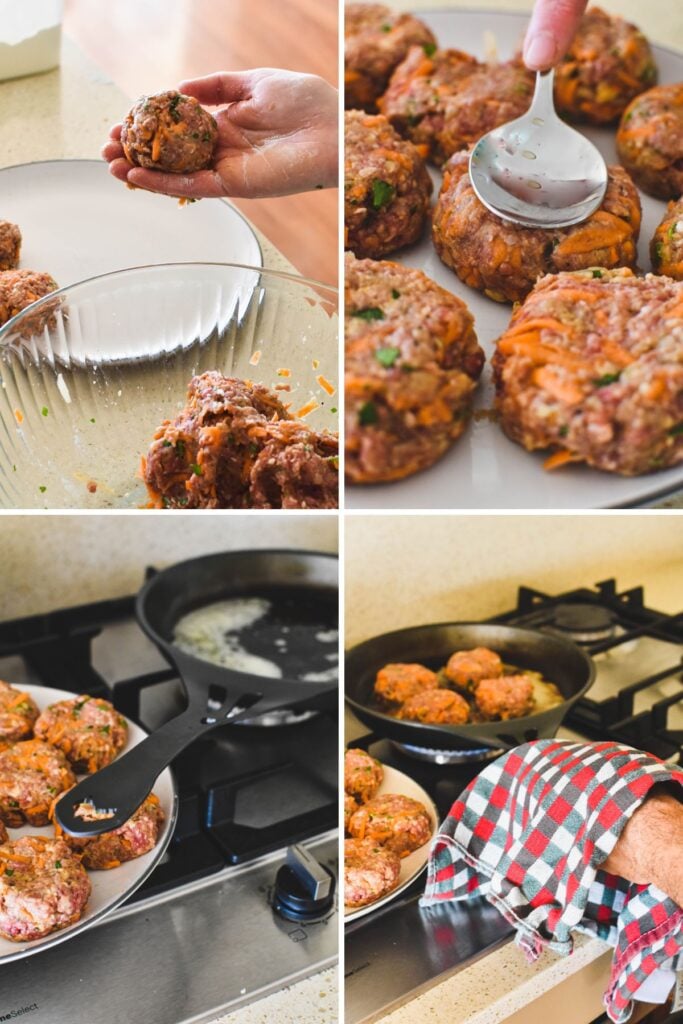
Grate the carrot and onion and lightly beat the egg.
Next, simply combine all of the ingredients – apart from the butter and oil – in a mixing bowl.
You can try combining it with a spoon, but I find the best way is to get your hands in there and mix everything together.
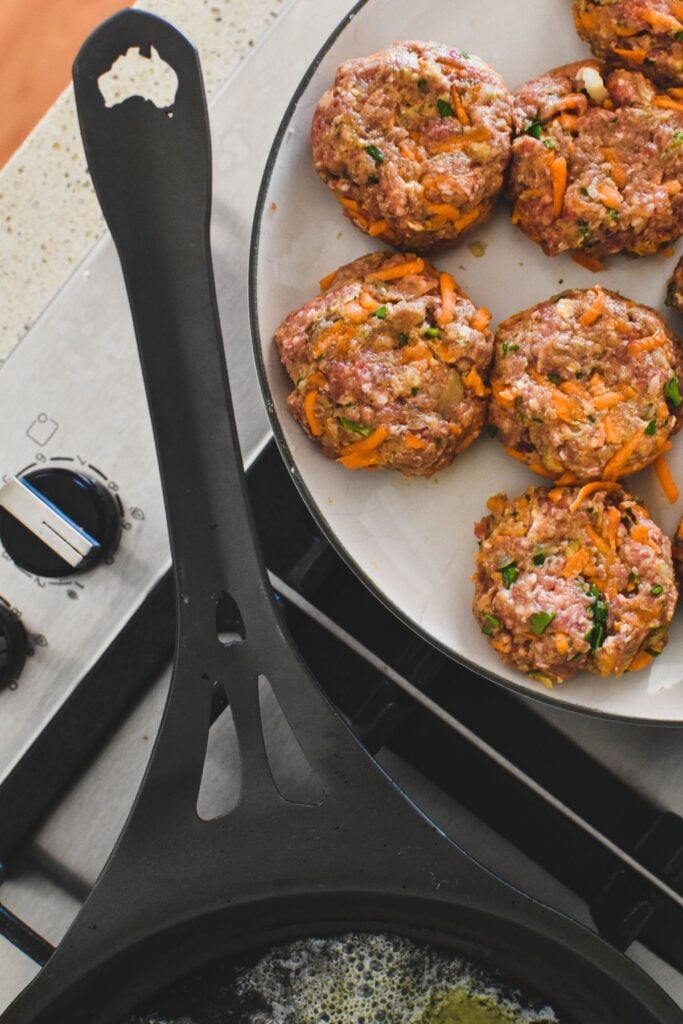
Next, flour your hands before shaping the mixture into about 10 rissoles.
They should be shaped like flattened balls (see pictures below).
Use a dessert spoon to flatten tops a little and create a slightly concave shape.
Let's cook
Heat butter and oil in a frypan.
FUN FACT: Using both butter and oil is something I do a lot and this was also specified in the "Favourite Rissoles" recipe I borrowed from for this recipe. Mixing oil and butter actually increases the smoke point and the flavour, giving you the best of both worlds when it comes to frying. When searing foods that need to brown up, such as rissoles, this is a particularly good option.
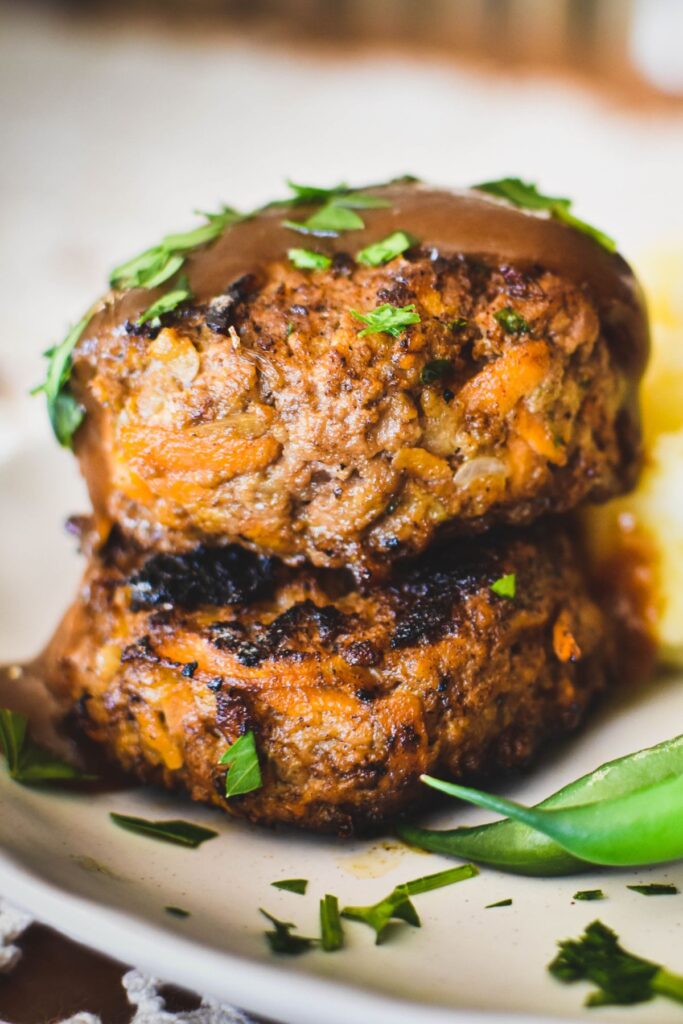
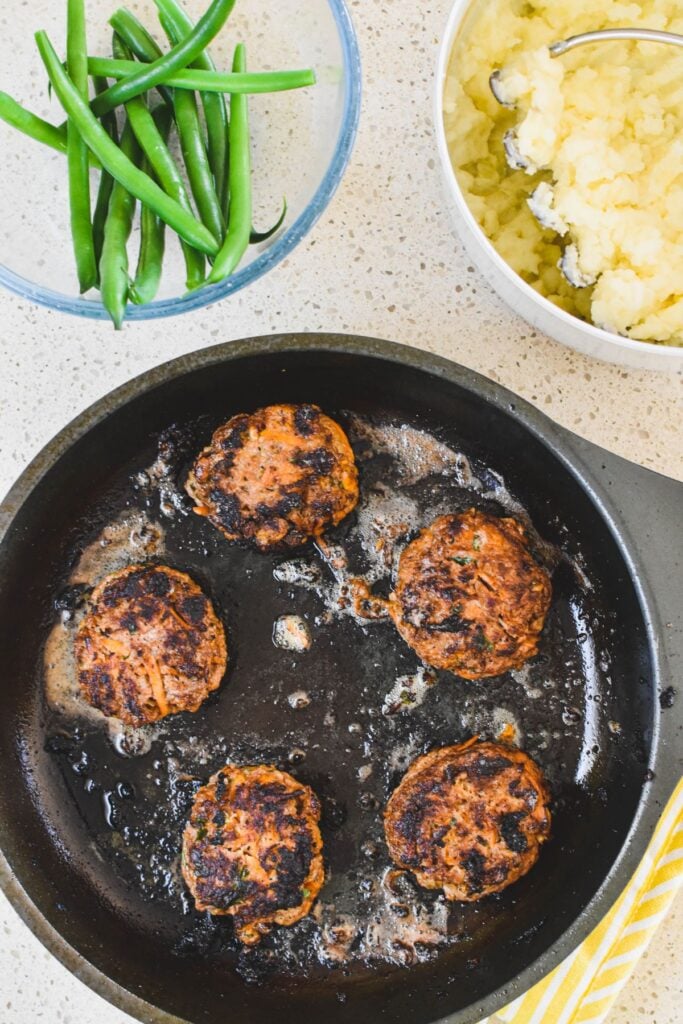
Cook both sides of the rissoles in your frypan until browned and cooked through (about 4 minutes on each side).
They can tend to burn, so you'll need to get to know your frypan and stovetop. As a general rule, let the pan heat up at medium heat.
Let the rissoles form a crust and then turn the heat down a little after a minute or so.
Continue cooking for a few more minutes and then give the rissoles a little jiggle with tongs before turning to cook the other side.
Are my rissoles cooked through?
Your rissoles should be browned nicely on the outside for starters.
Then comes the guessing game of whether they are cooked in the middle.
You could buy a meat thermometer, poke it into your rissole and check it has reached at least 70 degrees celsius.
I prefer the less scientific approach. I feel the tops of the rissoles, and can tell whether they are cooked by how firm they are.
To learn what they should feel like when cooked, simply press them from time to time throughout the cooking process and then cut one in half when you think they're ready. You'll soon learn how to use this easy method of judging when rissoles are cooked through.
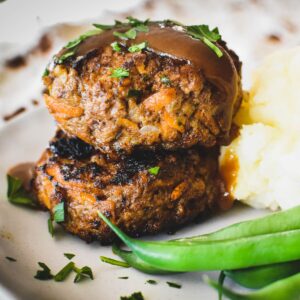
What to serve with Rissoles
In my world, the only thing to serve with rissoles is mashed potato and some beens or other greens.
If you want to get a bit fancy, add a little gravy and a sprinkling of chopped parsley.
If you're serving this up for kids, you might want to add a generous amount of tomato sauce.
Of course, rissole are extremely versatile. There are plenty of ways to serve them, including:
- with a salad
- on a roll with tomato relish
- with coleslaw.
Enjoy rissoles some other way? Let us all know in the comments below!
Variation ideas
I like this recipe just as it is.
But, I get it, we all like to customise things to our own liking.
You could try this recipe with:
- lamb, chicken or pork mince instead of beef
- wholemeal bread crumbs instead of white bread crumbs
- oregano or another herb instead of parsley
- BBQ sauce instead of tomato sauce
- zucchini instead of carrot.
Recipe FAQs
I'm going to leave you with some final rissole tips and FAQs.
This one can be difficult to diagnose, with a range of potential causes.
However, here are the most likely reasons:
- you omitted the egg (this ingredient is important to bind the rissoles)
- the mixture was too dry or too moist (what breadcrumbs did you use? was the carrot too big?)
- the heat was too high (meaning the rissoles are burned on outside and uncooked in the middle)
- over-mixing or over-handling the mixture (this can cause the meat proteins to bind too tightly, creating a dense and crumbly texture)
- not shaping the rissoles properly before cooking (shape the mixture into consistent-sized rissoles and smooth out any obvious cracks with your hands before cooking).
TIP: To reduce the chance of this happening, you can also rest the rissole mixture in the fridge for about half an hour before rolling into rissoles.
You can, but they're not as tasty. Bake in a moderate oven for about half an hour.
More retro Aussie meals
Family tiring of rissoles? Check out these other awesome Aussie recipes:
Dessert time?
Choose a dessert to follow:


Rissoles Recipe
Equipment
- 1 heavy-based frypan
Ingredients
- 500 grams beef mince (ground beef)
- 1 onion, grated
- ½ cup fresh breadcrumbs (if using packaged breadcrumbs, use a little less, about ⅓ cup)
- 1 carrot, grated
- 1 egg, lightly beaten
- 1 tablespoon chopped parsley
- 1 tablespoon tomato sauce (ketchup)
- 2 teaspoons worcestershire sauce
- salt and pepper (to taste)
- 20 grams butter
- 2 teaspoons oil
Instructions
- Combine all ingredients apart from butter and oil in a bowl and mix well (use your hands!).
- Shape into about 10 rissoles with floured hands. Use a dessert spoon to flatten tops a little.
- Heat butter and oil in a frypan. Cook both sides of rissoles in frypan until browned and cooked through (about 4 minutes on each side)
- Serve with mashed potato and veges.
Notes
- you omitted the egg (this ingredient is important to bind the rissoles)
- the mixture was too dry or too moist (what breadcrumbs did you use? was the carrot too big?)
- the heat was too high (meaning the rissoles are burned on outside and uncooked in the middle)
- over-mixing or over-handling the mixture (this can cause the meat proteins to bind too tightly, creating a dense and crumbly texture)
- not shaping the rissoles properly before cooking (shape the mixture into consistent-sized rissoles and smooth out any obvious cracks with your hands before cooking). To reduce the chance of this happening, you can also rest the rissole mixture in the fridge for about half an hour before rolling into rissoles.

Susan says
I like to use half lamb and half beef mince, add 2 tablespoons dried kale, fresh thyme, and sometimes rolled oats instead of breadcrumbs. After your tips, I plan to try half oil/half butter, Worcestershire sauce and grated onion instead of finely chopped. Thanks!
Libby Hakim says
You're welcome! And thanks so much for your tasty-sounding tips!
Glenn says
The same as what my Mum and now me cook except for the addition of some mixed herbs
Libby Hakim says
Yes, good ol' Aussie Rissoles 🙂
Erica says
Just like my Mums rissoles except she didn’t put carrot in them.. added a little diced raw tomato .. the rest is exactly the same. Made them last week using GF bread .. No difference really using GF bread … always make gravy with the bits in the pan and great next day on toast for breaky. Thanks Erica
Libby Hakim says
Awesome - thanks for your tips, Erica 🙂
Christine Smith says
My son always loved my rissoles. He said "everyone else puts carrot in theirs but you put tomato." That's the way my Mum made them too.
Jen says
Going to make these for sure. I need to make them GF friendly, which being a Ceoliac I understand how to do, but not sure on substituting GF packaged breadcrumbs for the fresh breadcrumbs. Can you provide me with some advice on this? Thanks so much.
Libby Hakim says
Hi Jen. Thanks so much for asking this question. If using any type of packaged breadcrumbs, I'd recommend using a little less than if using fresh – about 1/3 of a cup. I've added this to the recipe card, too. Enjoy your GF friendly rissoles 🙂