
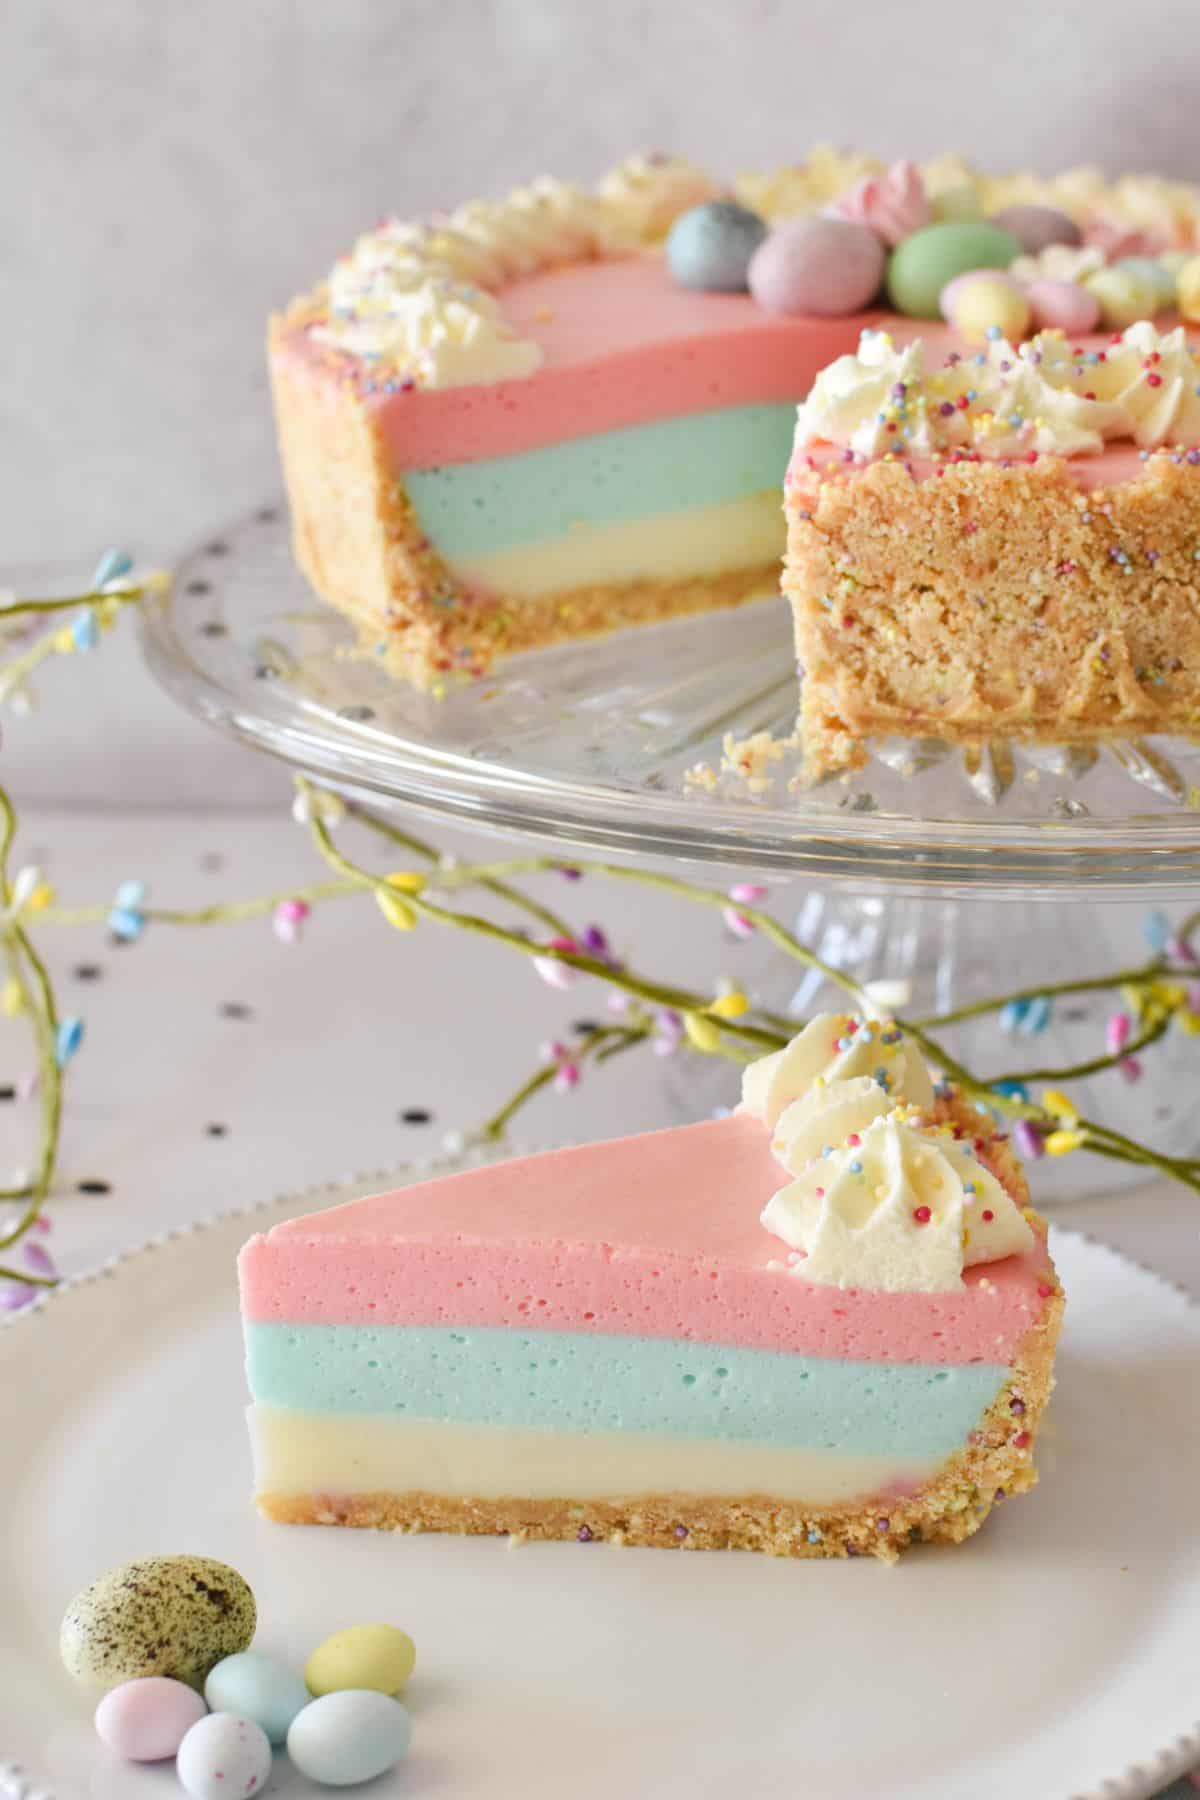
This no-bake Easter Jelly Pie is light and creamy, sweet and colourful, and is sure to be your new favourite Easter dessert.
This Jelly Pie dessert was inspired by the ever popular Jelly Slice Recipe, Nana Ling's old-fashioned flummery and US recipe blogger, Princess Pinky Girl's Easter Jello Pie.
It's best made the day before and you need to factor in setting time. Other than the timing factor, it's straightforward to make and is truly worth the effort.
Jump to:
Ingredient notes
There's nothing too fancy in the ingredient list – you should be able to find everything at your regular supermarket.
The jelly crystal flavours I've used here are strawberry and blue heaven. I thought these colours looked the most suited to Easter. However, you could certainly experiment with jelly flavours/colours for this recipe.
Also note that the sprinkles I used are sugar-free 100s &1000s – I used sugar-free as the sprinkles are a pretty pastel colour rather than the regular ones which are more brightly coloured.
I've used Milk Arrowroots here, but you can use any type of sweet, plain biscuit – Marie, Granita and Scotch Finger are other good options.
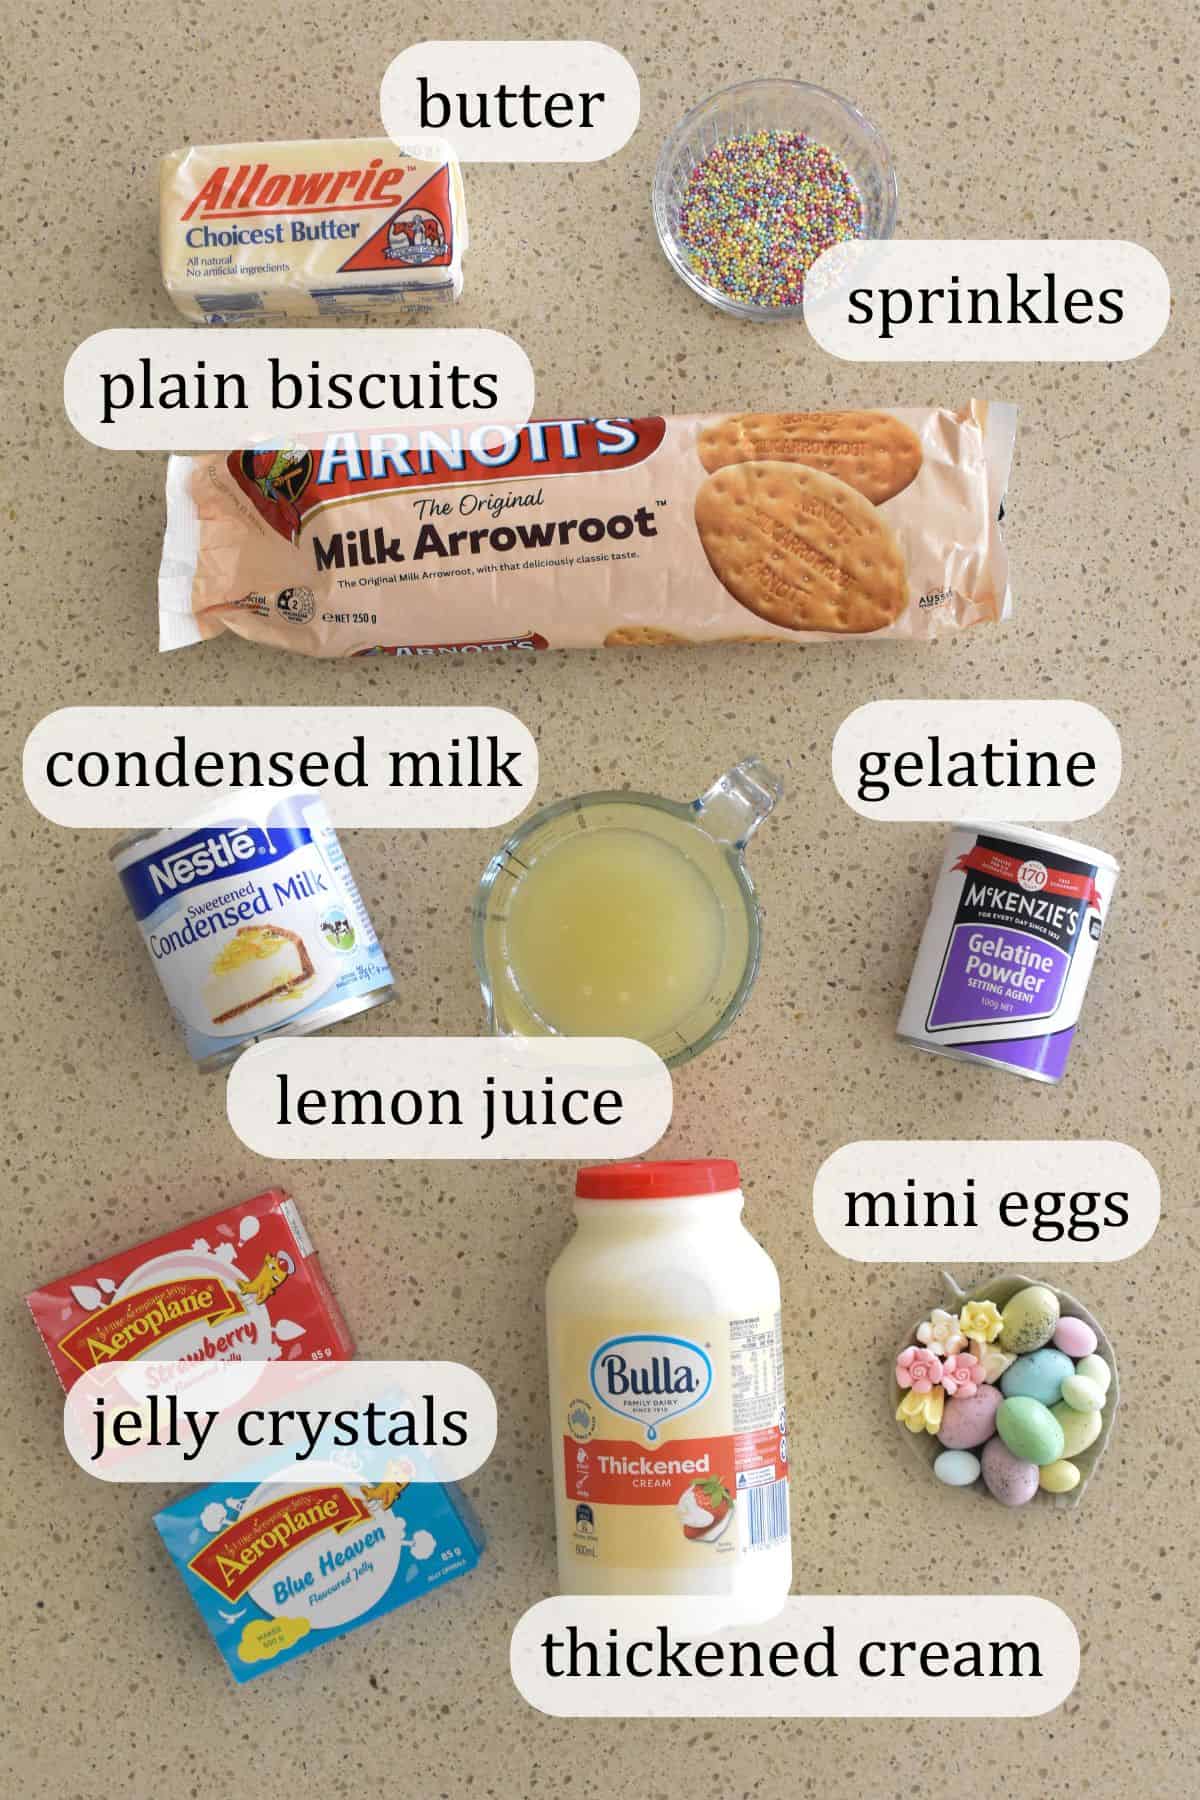
See the recipe card at the bottom of this post for a full ingredient list with quantities.
How to make Easter Jelly Pie
If you've made Jelly Slice before, you're halfway there with the method.
TIP: There are several hours setting time involved in making this pie, including setting of layers before adding another. Make sure you read through the steps first so you can plan your timing.
I've made the pie using a large round springform cake tin (24.5cm x 6.5cm). A springform tin helps you ease it from the tin so you can present it on a cake stand as a whole pie. You could use a similar-sized pie dish however it may be more difficult to remove before slicing it up. Having said that, you could slice it while it's still in the tin.
Okay, let's make our Easter Jelly Pie!
Making the pie crust
Grease the round cake tin and line the base with baking paper. Using the springform tin, as recommended? Then place a large piece of baking paper on the base before attaching the side of the tin so that the paper overhangs the sides to assist with removal once the pie is set.
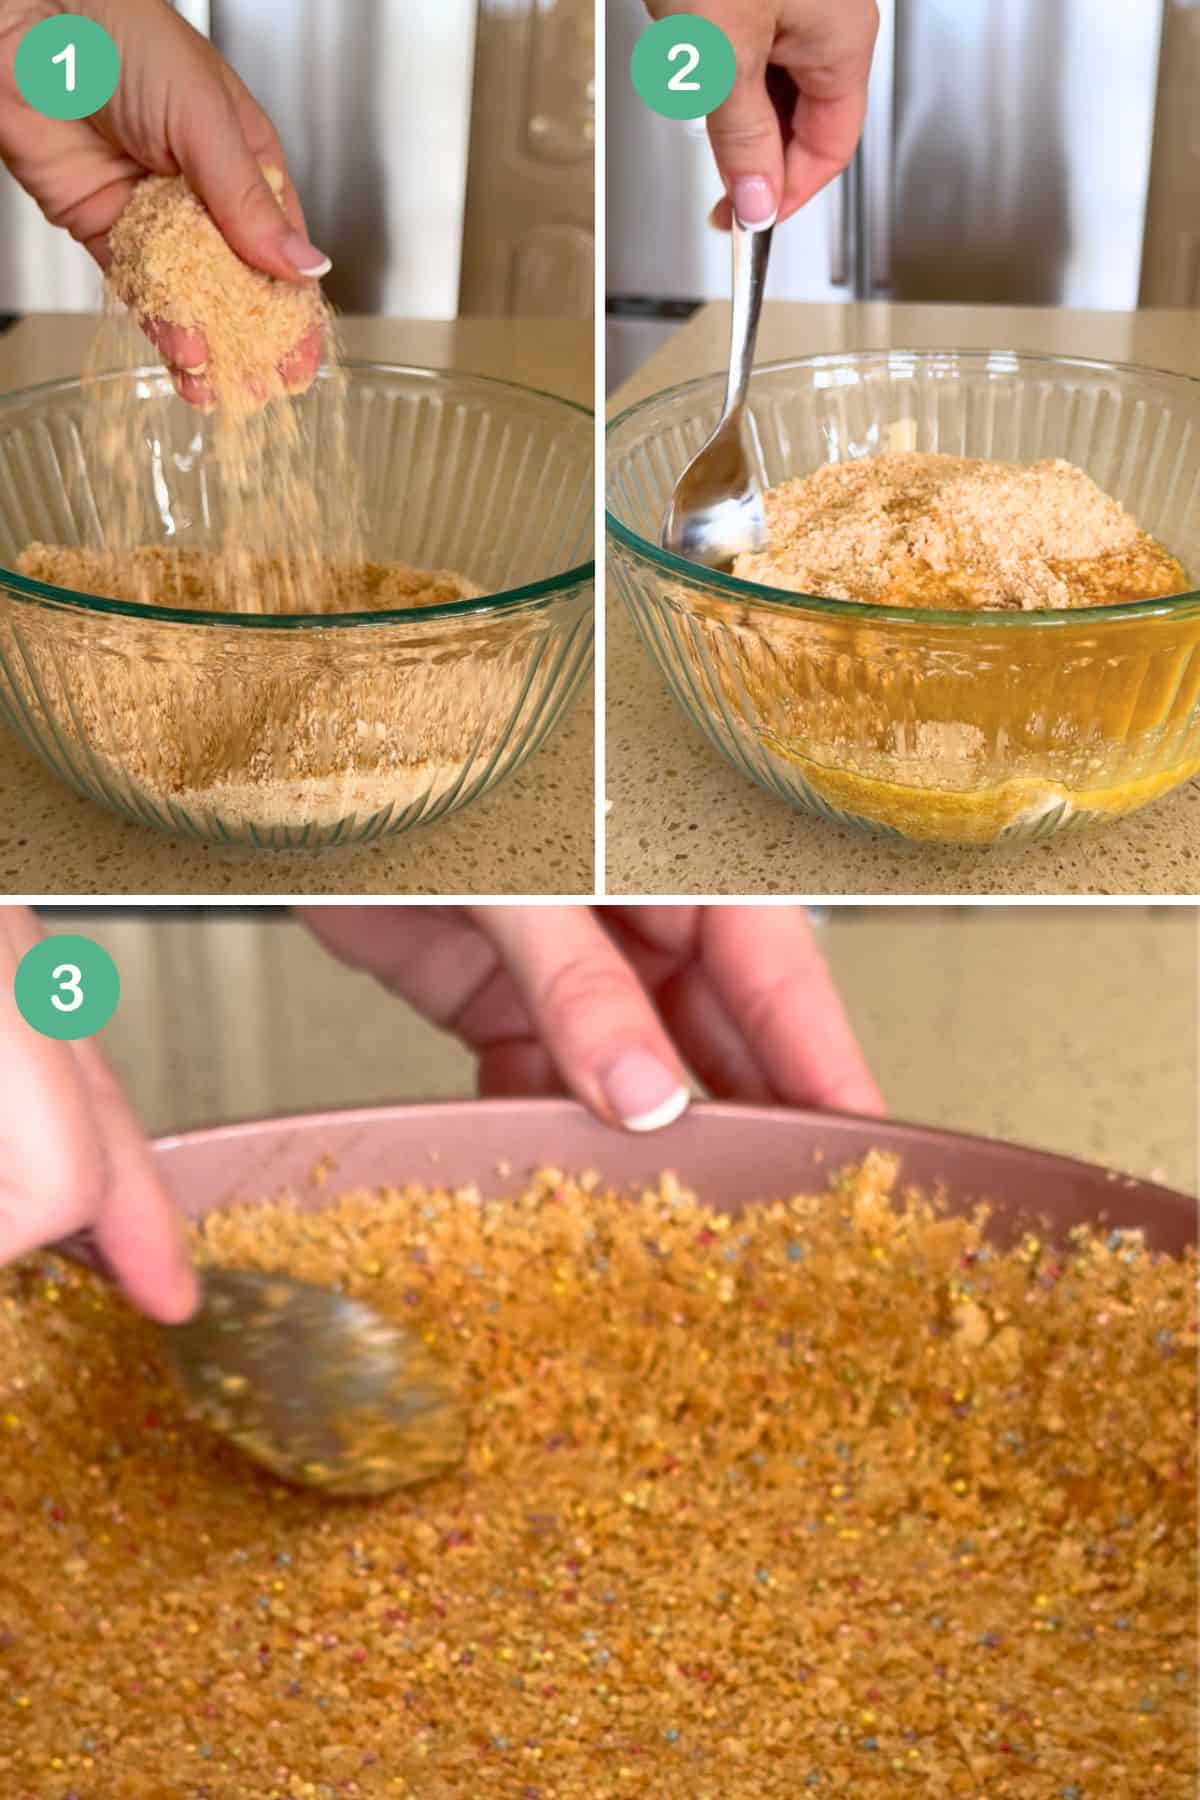
Crush the biscuits until they resemble fine breadcrumbs using a rolling pin, chopper or food processor (see image 1).
Add the melted butter to the biscuit crumbs and stir to combine (see image 2). Add the sprinkles and stir again to combine.
Press the biscuit mixture into the bottom of the cake tin and about ¾ of the way up the sides of the tin. Smooth with the back of a metal tablespoon (see image 3). Place into the fridge and start on the first layer.
Adding layer 1
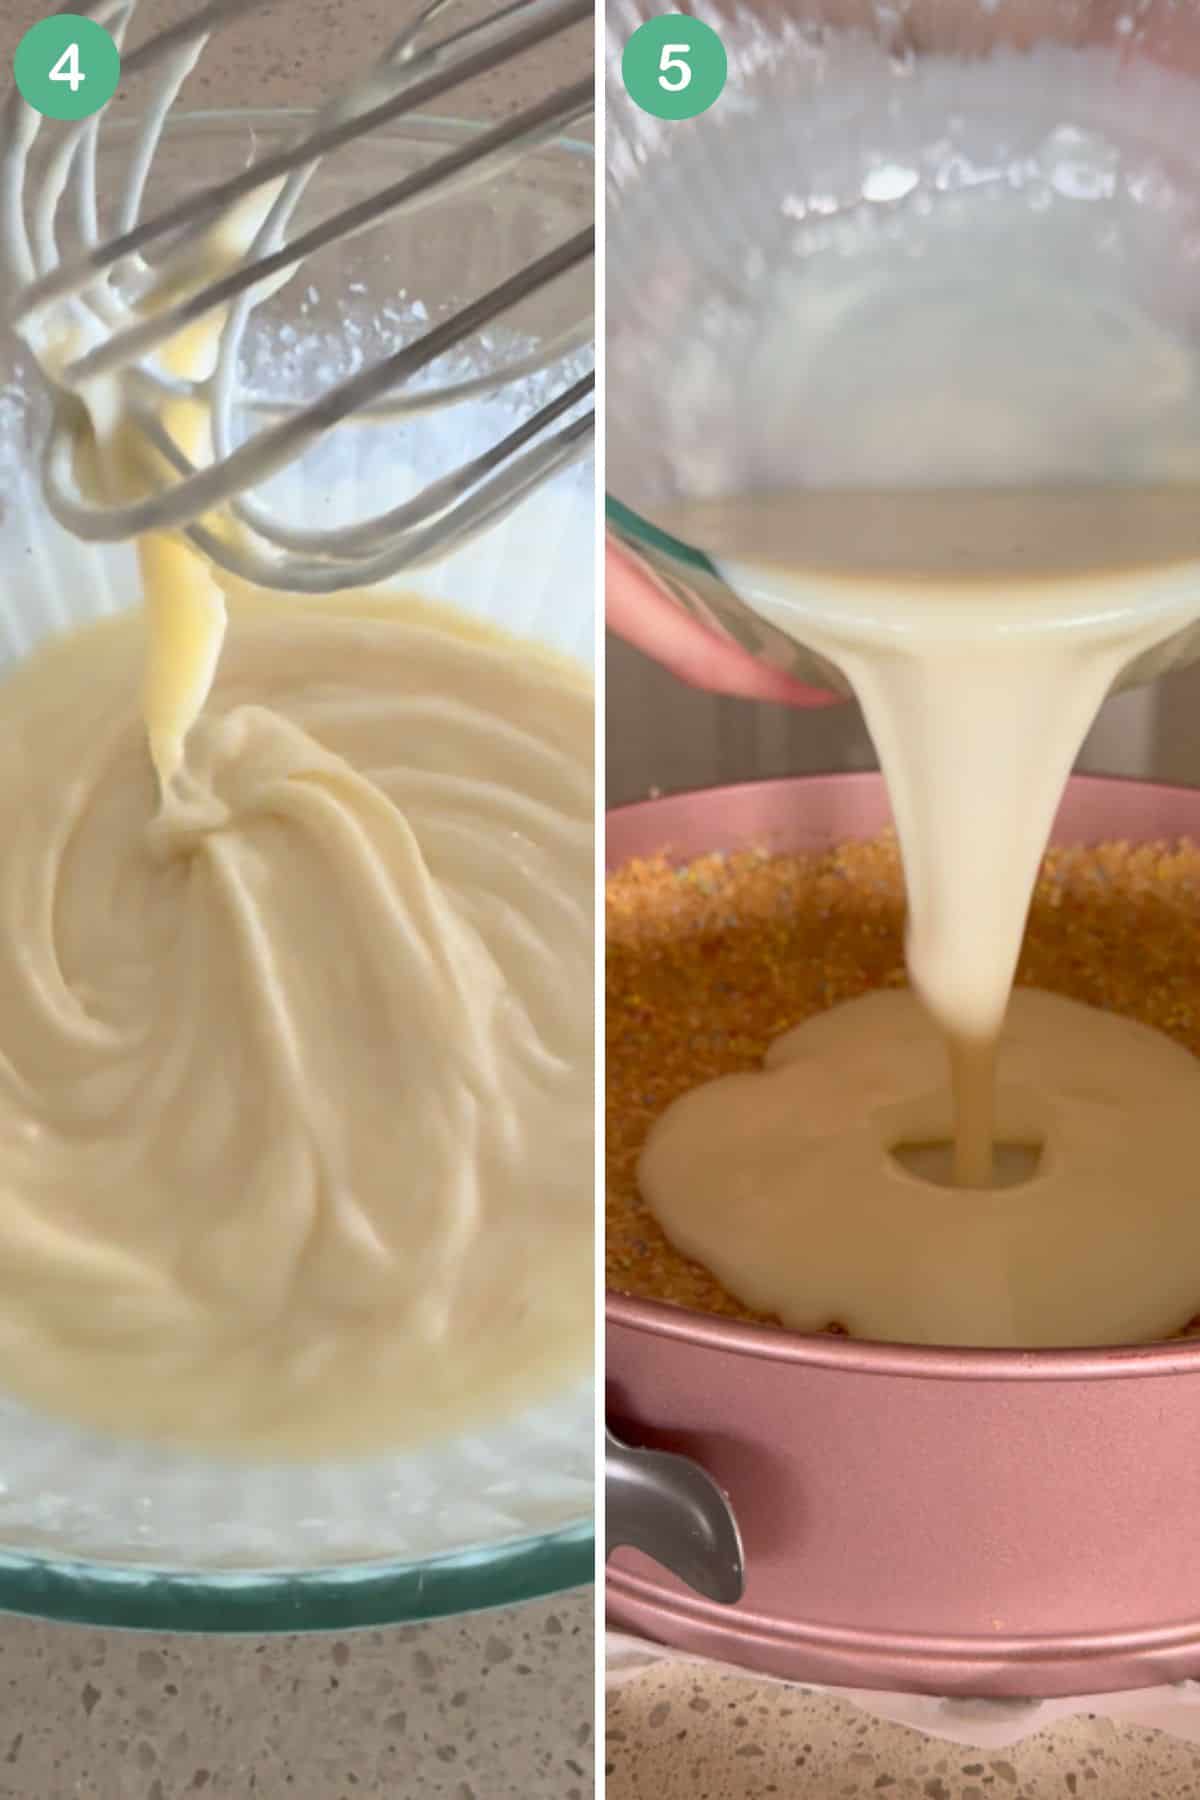
Pour the condensed milk into a bowl and add the lemon juice. Use a whisk to combine until the mixture has thickened (see image 4).
Next, dissolve the gelatine in the boiling water and then add this to the lemon and condensed milk mixture. Use a whisk to combine.
Remove the cake tin from the fridge and pour the mixture into the pie crust (see image 5). Smooth out the top with a spatula to ensure the layer is even. Return to fridge.
Adding layer 2
Once you put layer 1 in the fridge to set, you can start making up the first jelly colour.
Combine the jelly crystals with boiling water and stir to dissolve the crystals. Place into the fridge for 90 minutes.
TIP: You are not making up the jelly according to the packet instructions. Instead, follow the recipe instructions (which adds significantly less water).
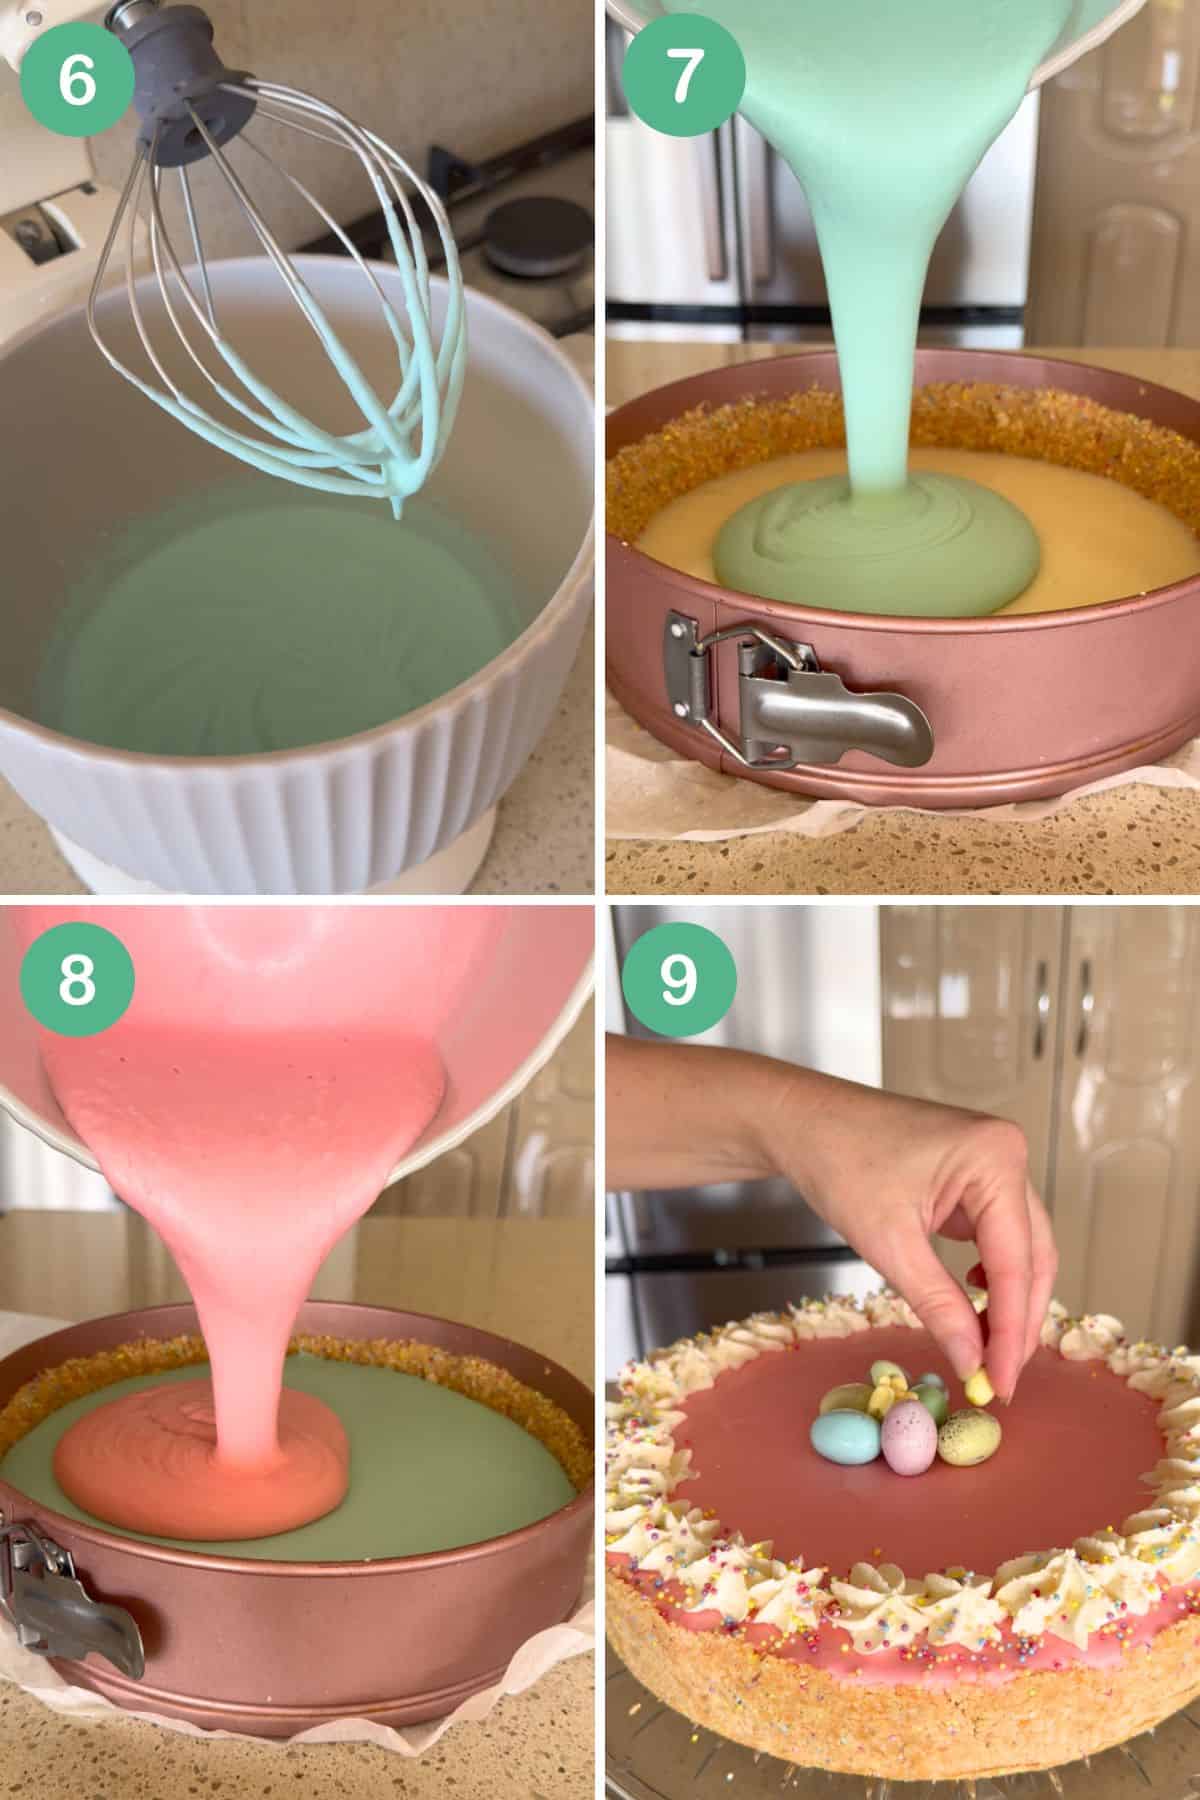
After 90 minutes, the jelly should be partially set (but still able to be poured). Pour the jelly and the cream into the bowl of a stand mixer and beat on slow (and then med-high speed as it thickens) in a stand mixer for about 5 minutes or until it doubles in volume and looks more glossy (see image 6).
Take the pie from the fridge and pour the jelly mixture over the condensed milk layer (see image 7). Smooth out the top with a spatula to ensure the layer is even. Return to fridge.
Adding layer 3
As soon as you put layer 2 in the fridge to set, it's time to make up the second jelly colour.
Again, combine jelly crystals with boiling water and stir to dissolve the crystals. Place into the fridge for 90 minutes. After 90 minutes, with the jelly partially set, pour the jelly and the cream into the bowl of a stand mixer and beat on slow (and then med-high speed as it thickens) in a stand mixer for about 5 minutes or until it doubles in volume and looks more glossy.
Take your pie from the fridge and pour the jelly mixture over the condensed milk layer (see image 8). Smooth out the top with a spatula to ensure the layer is even. Return to fridge.
Setting and decorating
Allow the Easter Jelly Pie to set in the fridge for at least 3 hours.
Once set, remove the pie from the cake tin. You may need to free the sides from the tin first by sliding a butter knife down the sides. Alternatively, you can leave the pie in the tin and cut into slices while it's in the tin.
To decorate, whip the cream and pipe around edges of the pie. Add sprinkles and then place a small, round pile of mini eggs and sugar flowers in the middle of the pie (see image 9).
Serving and storage
Serve immediately once decorated. Cut slices of the pie with a sharp knife.
Your jelly pie will last up to 3 days in the fridge. Cover with food wrap. Not suitable for freezing.
Top Tip
This recipe is all about the timing! Make your jelly pie the day before serving (or early on the day of a night time event), and don't decorate until you're ready to serve.
More Easter desserts
Looking for other recipes for a Happy Easter? Try these:

Made this recipe and love it? Please take a moment to rate the recipe and leave a comment below. It’s such a help to others who want to try the recipe. (And it really makes my day to hear how Nana Ling's recipes are being made, shared and loved all around the world! - Libby x)
For more fun and deliciousness in the kitchen, follow along on Facebook, TikTok and Pinterest, and subscribe for new posts via email.

Easter Jelly Pie
Equipment
- large round cake tin (24.5cm x 6.5cm, springform)
Ingredients
Pie Crust
- 250 grams plain biscuits (Arrowroot, Nice, Marie or a combination of those work well)
- 185 grams butter, melted
- 2 tablespoons sprinkles (pastel-coloured) (optional)
Layer 1 (Lemon Condensed Milk)
- 395 gram tin of condensed milk
- ½ cup lemon juice (juice from approx 2 large lemons)
- 2 teaspoons gelatine powder
- ½ cup boiling water
Layer 2 (Jelly/Flummery Colour 1)
- 85 gram packet jelly crystals (blue heaven or another preferred flavour)
- 250 ml boiling water (1 cup)
- 200 ml thickened cream
Layer 3 (Jelly/Flummery Colour 2)
- 85 gram packet jelly crystals (strawberry or another preferred flavour)
- 250 ml boiling water (1 cup)
- 200 ml thickened cream
Decorating
- 200 ml thickened cream
- 1 tablespoon sprinkles (pastel-coloured)
- mini eggs and sugar flowers
Instructions
- Grease a round cake tin (24.5cm x 6.5cm) and line the base with baking paper (if using a springform tin, as recommended, place a large piece of baking paper on the base and then attach the side of the tin so that the paper overhangs the sides to assist with removal once the pie is set).
Pie Crust
- Crush the biscuits until they resemble fine breadcrumbs using a rolling pin, chopper or food processor.
- Add melted butter to the biscuit crumbs and stir to combine. Add the sprinkles and stir again to combine.
- Press the biscuit mixture into the bottom of the cake tin and about ¾ of the way up the sides of the tin. Smooth with the back of a metal tablespoon. Place into fridge.
Layer 1
- Pour condensed milk into a bowl. Add the lemon juice and use a whisk to combine until the mixture has thickened.
- Dissolve gelatine in the boiling water and then add this to the lemon and condensed milk mixture. Use a whisk to combine.
- Remove the slice tin from the fridge and pour the mixture into the pie crust. Smooth out the top with a spatula to ensure the layer is even. Return to fridge.
Layer 2
- As soon as you put layer 1 in the fridge to set, make up the first jelly colour.
- Combine jelly crystals with boiling water and stir to dissolve the crystals. Place into the fridge for 90 minutes.
- After 90 minutes, the jelly should be partially set (but still able to be poured). Pour the jelly and the cream into the bowl of a stand mixer and beat on slow (and then med-high speed as it thickens) in a stand mixer for about 5 minutes or until it doubles in volume and looks more glossy.
- Take your pie from the fridge and pour the jelly mixture over the condensed milk layer. Smooth out the top with a spatula to ensure the layer is even. Return to fridge.
Layer 3
- As soon as you put layer 2 in the fridge to set, make up the second jelly colour.
- Combine jelly crystals with boiling water and stir to dissolve the crystals. Place into the fridge for 90 minutes.
- After 90 minutes, the jelly should be partially set (but still able to be poured). Pour the jelly and the cream into the bowl of a stand mixer and beat on slow (and then med-high speed as it thickens) in a stand mixer for about 5 minutes or until it doubles in volume and looks more glossy.
- Take your pie from the fridge and pour the jelly mixture over the condensed milk layer. Smooth out the top with a spatula to ensure the layer is even. Return to fridge.
- Allow pie to set for at least 3 hours.
Decorating
- Remove pie from the cake tin. You may need to free the sides from the tin first by sliding a butter knife down the sides.
- Whip cream and pipe around edges of the pie. Add sprinkles and then place a small, round pile of mini eggs and sugar flowers in the middle of the pie.
- Serve immediately. Cut slices of the pie with a sharp knife.
Notes
- Make sure you use the lesser quantity of water when making up the jelly as indicated in this recipe. Do NOT make up the jelly according to the packet instructions as it will not set firm enough to cut.
- Don't be tempted to rush this recipe. You need to make sure all layers have set to get that lovely and defined 3-layered effect.


Libby
Enjoy!