
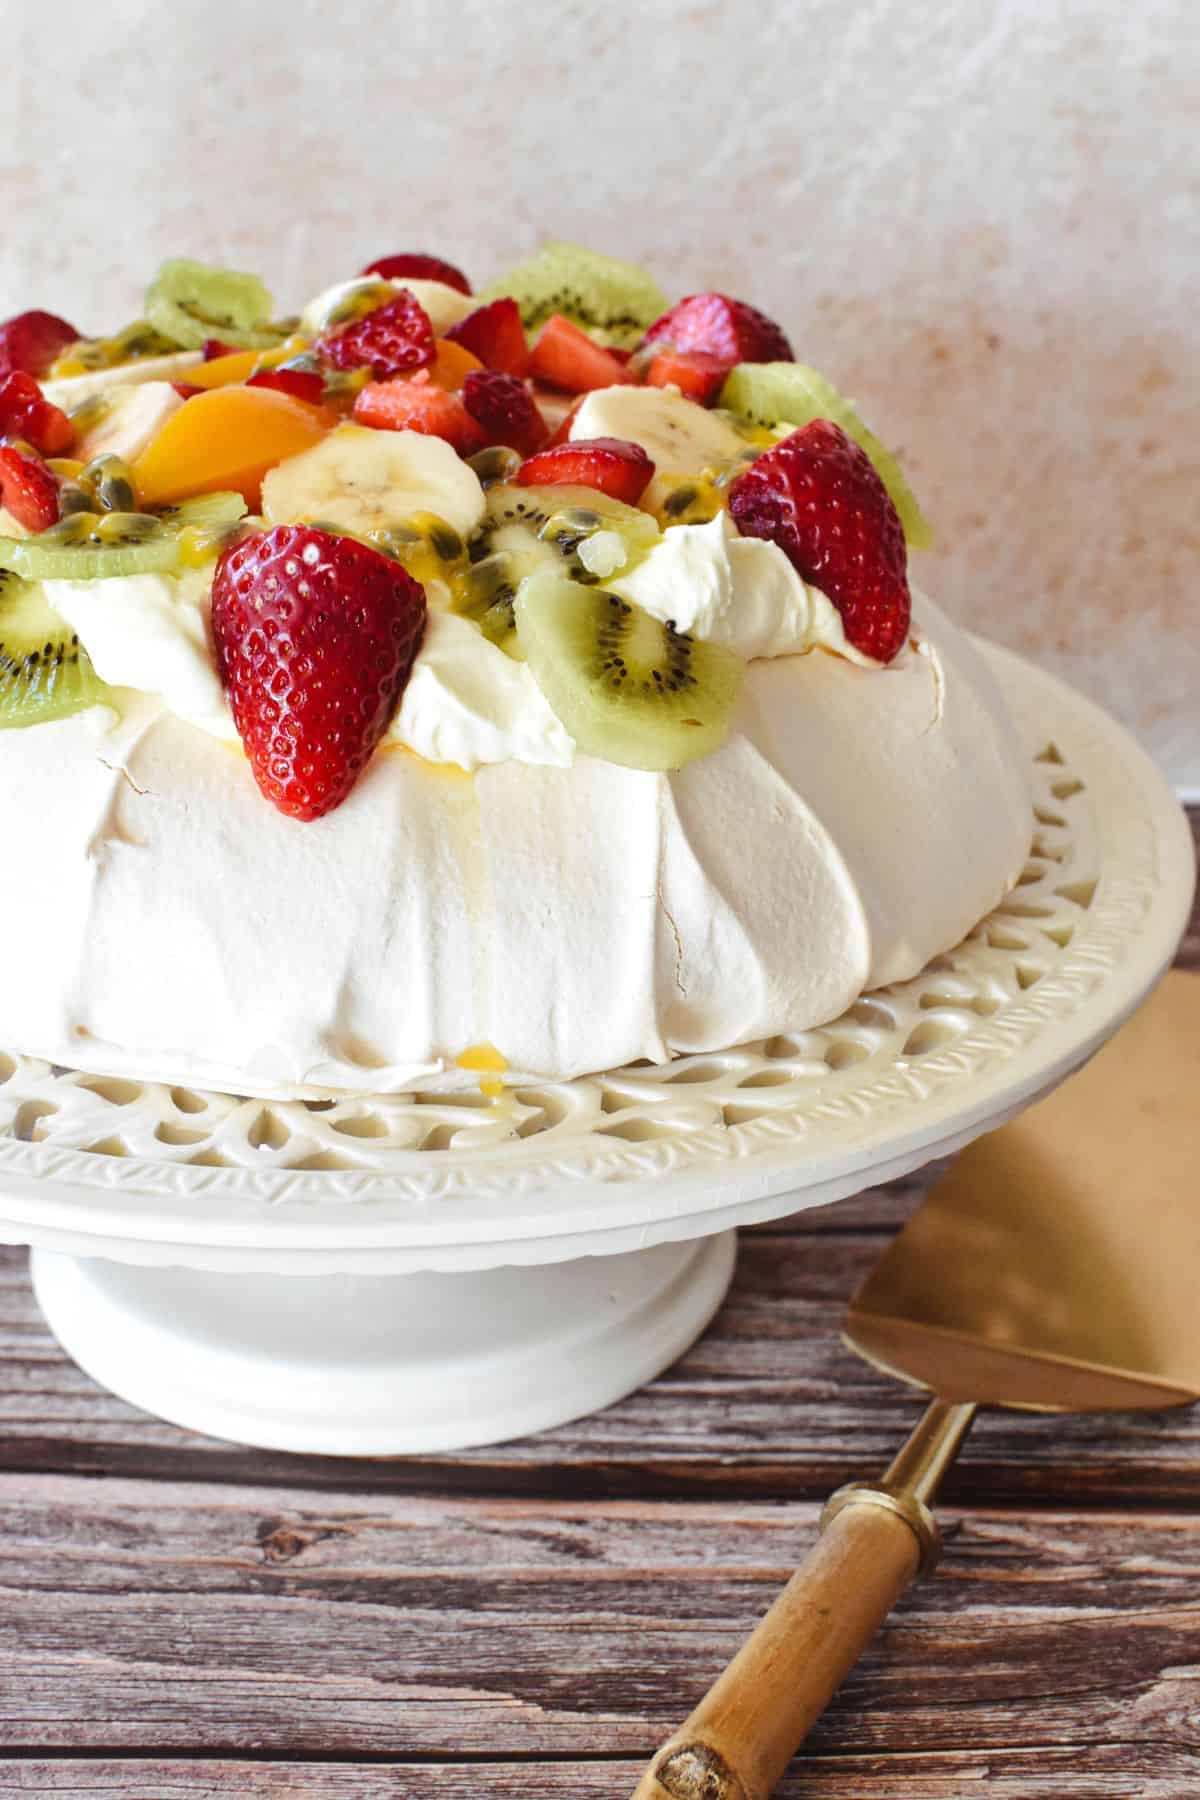
It's a huge call, but I reckon this Pavlova Recipe is the best of the best. It will deliver a dessert that looks good and tastes sensational, with a smooth and fluffy marshmallow centre encased in a delicate and crisp meringue shell – even if you've never made a pav before!
Jump to:
Why this recipe is BEST
This recipe is now rated 4.95/5 and has attracted glowing reviews, including this one:
I was terrified of making a Pavlova but followed your recipe and instructions to the letter and it was a real success, crisp but not too crisp on the outside and soft and fluffy marshmallow on the inside so a big thank you from Belfast, Northern Ireland.
Jayne
The secret to this recipe's success?
- Decades of pavlova-making experience: it's my favourite dessert and I'm so fussy about it being perfect that my (also fussy) mum handed me the Christmas pav making duties many years ago.
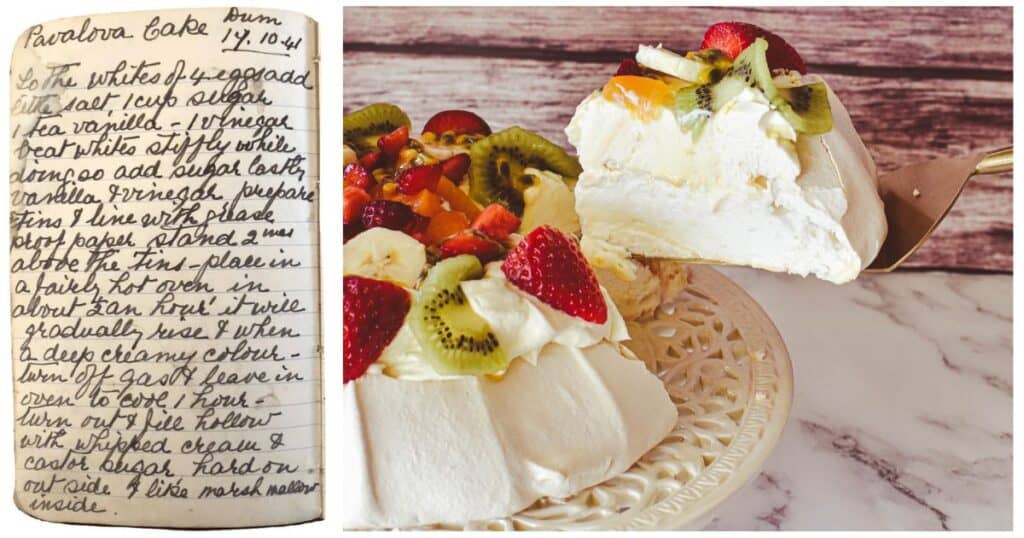
- Nana Ling's original recipe from 1941: it's one of Australia's earliest recorded recipes (the earliest being published in a newspaper in 1935) and notably leaves out a more modern ingredient which I believe isn't necessary and detracts from the flavour and texture.
- I know all the hits and misses involved – and have added tips for success, photos of key steps and everything you'll need to avoid the pitfalls that lead to weeping, cracking and other spoilers.
A little history
Pavlova was initially named "Pavlova Cake" and was a more elaborate cake with layers of jelly and meringue made separately. It gradually evolved into the pavlova we now see on modern tables throughout Australia, New Zealand and the rest of the world – especially at Christmas time.
I'm going to completely bypass the Australia vs New Zealand origin argument – there's already enough fighting over pavlova at Christmas time when a few family members start eyeing the last slice! Most people agree, though, that this dessert is named after the Russian ballerina Anna Pavlova who visited Australia and New Zealand in the 1920s. , but modern versions of the recipe didn't start appearing in Aussie cookbooks until the 1930s and 40s.
I've included a picture of Nana Ling's recipe, likely one of the first handwritten records of this iconic recipe, below. While I've largely followed this original pavlova recipe, I recommend you keep reading this post and follow the recipe card at the bottom of this post. There are plenty of hints and tips to discover as you scroll and note, in particular, that I've tweaked the cooking time slightly to suit modern ovens.
Ingredient notes
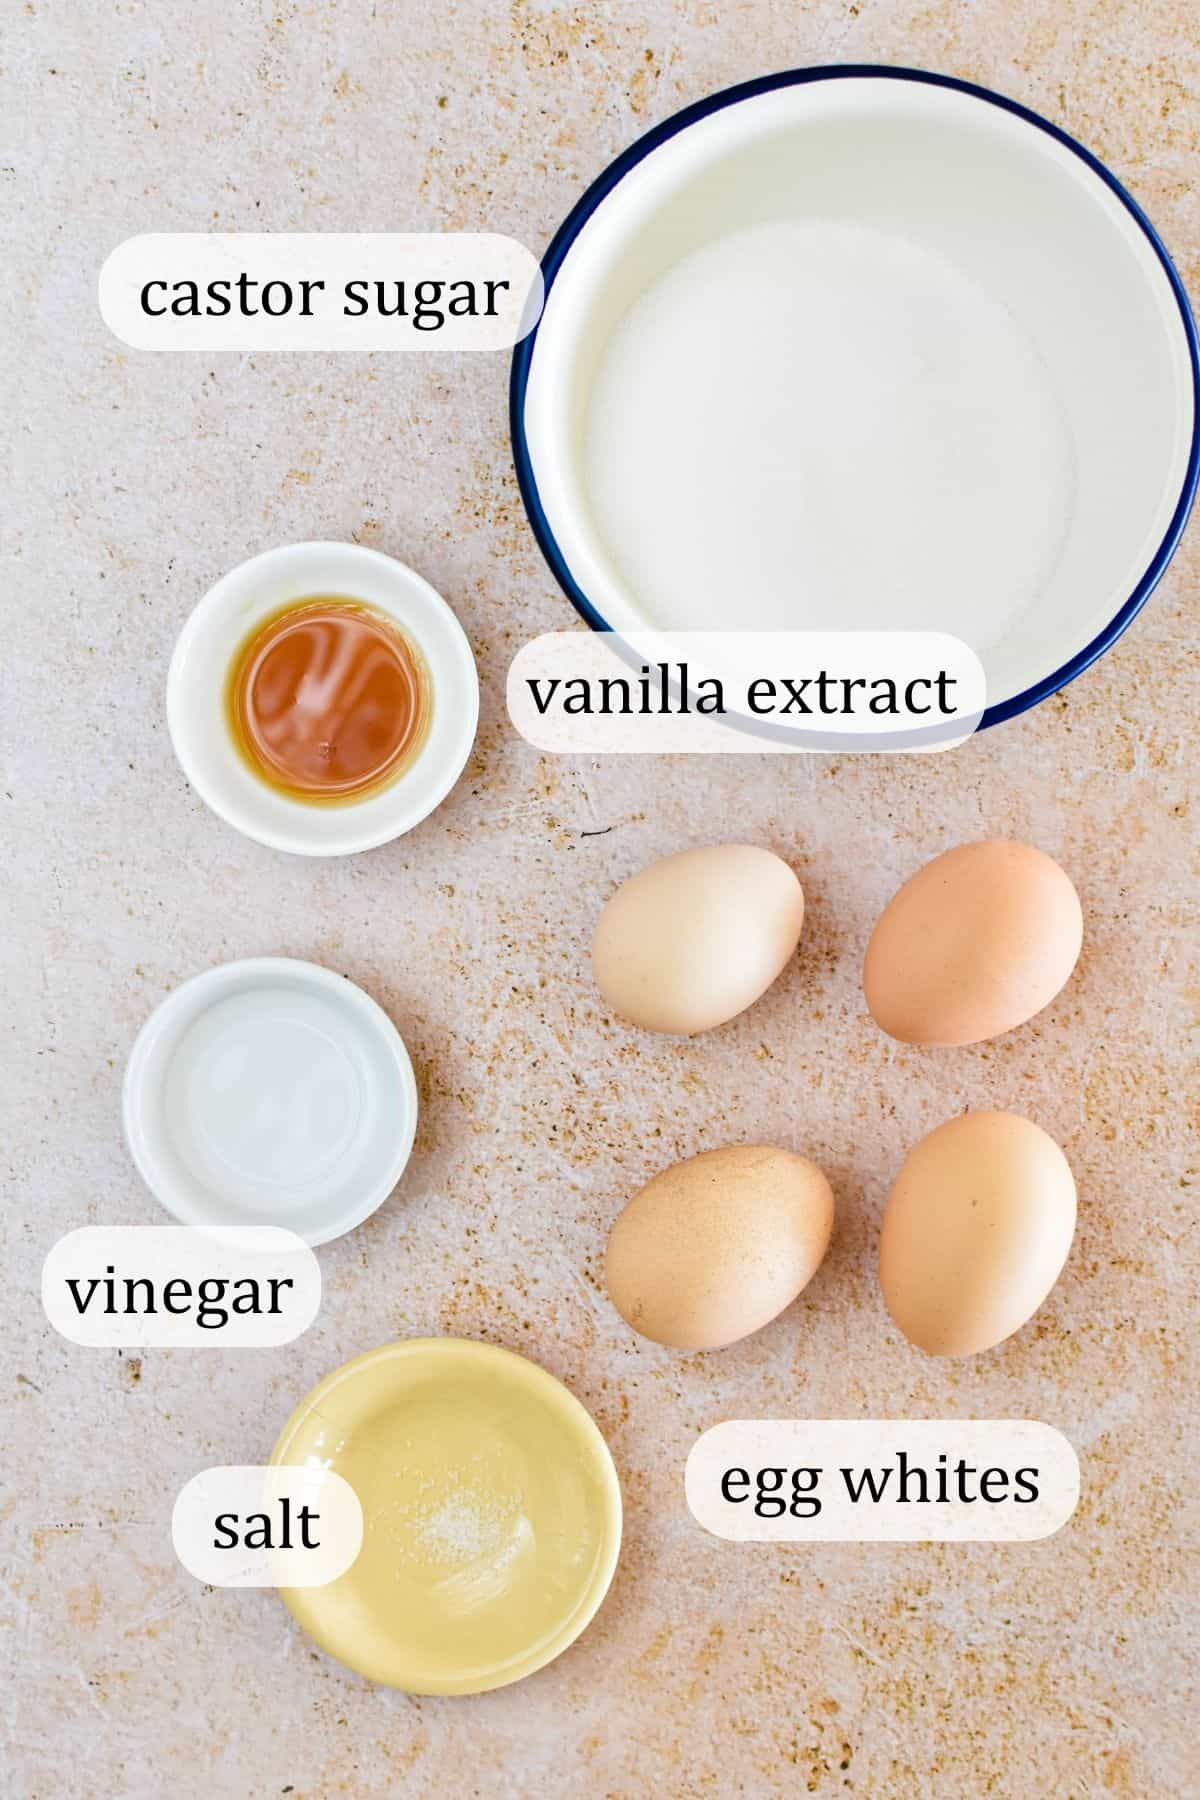
I've used the exact ingredients Nana Ling lists in her original recipe:
- egg whites from medium (60 gram) eggs (separate eggs while cold from the fridge and then let the whites stand at room temperature for at least half an hour before using)
- salt (table salt or another fine-grain salt works best)
- caster sugar / superfine sugar (avoid regular white sugar as the finer caster sugar will dissolve more easily and if you only have this coarser sugar on hand, use a food chopper or processor to pulse or blend until it reaches a finely ground consistency.)
- vanilla extract
- white vinegar.
When it comes to taste, Nana Ling's recipe notably leaves out the cornflour/cornstarch or cream of tartar that many modern recipes insist should be added. I've found this additional ingredient is not necessary and can add a floury taste that detracts from the overall heavenly experience of enjoying a slice of pavlova.
TIP: Avoid increasing the ingredient quantities as this can impact the stability of the pavlova. If you want a bigger pavlova, make two instead.
You'll also need these ingredients for decorating your pavlova:
- thickened cream / heavy cream
- icing sugar / powdered sugar
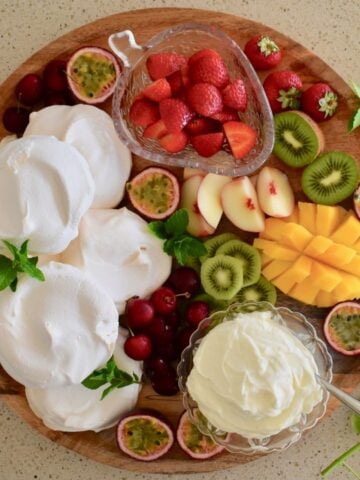
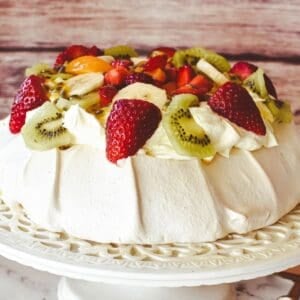
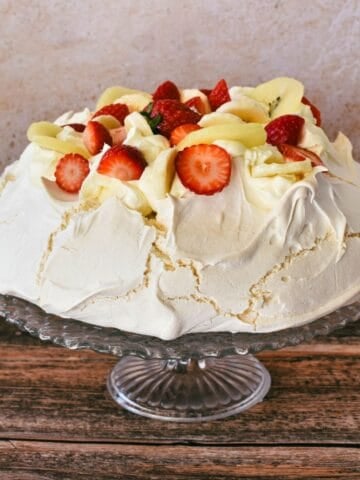
- fruit (I've used strawberries, peach, banana, passionfruit and kiwifruit).
TIP: If adding sliced banana (it's a bit old-fashioned but my nan always added it and I still love it), squeeze a little lemon juice over to stop it going brown.
How to make Pavlova
Pavlovas can be a little tricky – prone to burning, cracking, collapsing and weeping. To avoid these nasties and create something that looks wonderful and tastes even better, read this entire post carefully and follow the recipe card at the bottom of this post. At the very least, read the following tips and then jump to the recipe card.
Tips before you start
Here are the key things to keep in mind as you're whipping up your best pav ever:
- No yolk: even the teeniest, tiniest amount of yolk will spell ruin. To avoid such a catastrophe, separate the egg yolks from the whites while the eggs are cold (and, since the egg whites need to be at room temp, let the whites sit at room temperature for at least half an hour before using them).
- No moisture or grease: ensure stand mixer bowl, spatula and anything else that will come into contact with the mixture (including your fingers) are clean and dry – no moisture or grease!
- Be as graceful as the ballerina its named after: Bring on those light, airy and delicate moves – don't over-beat the mixture and don't get heavy-handed when moving the pavlova or decorating it. Go slowly and gently.
- Ballerinas are strong, too: the structure needs to be there so make sure the sugar dissolves (check by rubbing a small amount of mixture between two fingers – more on that below), the mixture holds its shape (see image 3, below) and you scrape up the edges once you've created that round shape (as outlined below) to reinforce that strength.
- Set an alarm: there is a reduction in oven temperature during the cooking process, so make sure to set an alarm.
- Be patient: once you switch off the oven, leave pavlova in there to gradually cool – it'll need at least 6 hours, preferably leave it overnight.
Prepping
Preheat your oven to 130 degrees celsius / 265 degrees fahrenheit (fan-forced). Line a baking tray, round bottom from a round springform pan or round pizza tray with baking paper.
Get your mixer ready – a stand mixer with a whisk attachment is ideal, but handheld electric beaters will do the job. Also, make sure the mixing bowl and your equipment is clean and dry.
Beat the eggs
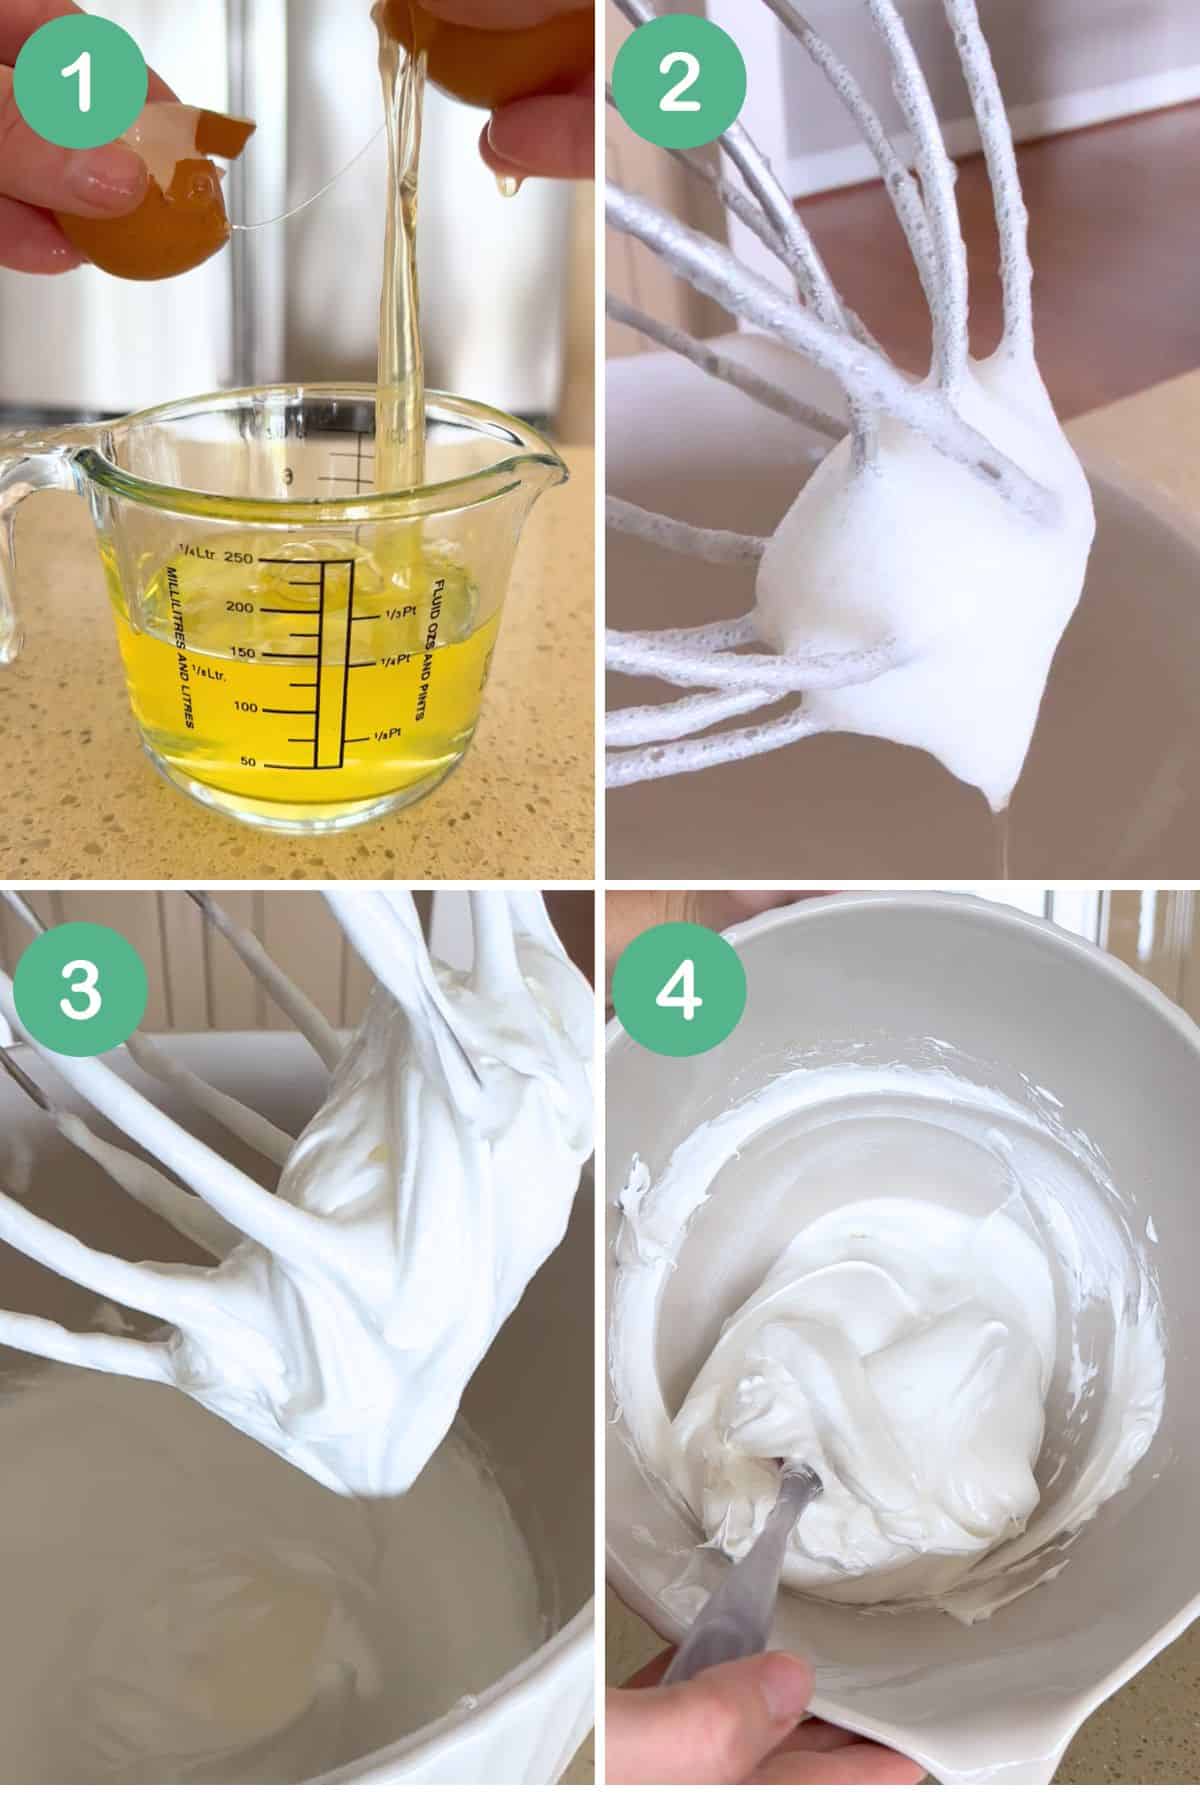
Remember, your egg whites should be at room temperature with not a trace of egg yolk left behind. In the recipe card below, I've included the weight of the eggs and number of egg whites, along with the precise measurement of egg whites (see image 1).
Once you're ready to go, beat the egg whites and salt together until the mixture forms soft peaks (see image 2).
TIP: Start beating on low speed and then increase to med-high speed. This should take 2-3 minutes. Don't over-beat.
Add the sugar
Reduce the mixer speed to low-med and add sugar gradually. I add the sugar in about 6 parts over 2 minutes.
Once all of the sugar is added, increase that mixer speed again (to med-high speed) and continue to beat for about 2-4 minutes. The mixture should become thick and glossy and hold its shape well (see image 3). At this stage, all of the sugar granules should have dissolved.
TIP: Once ready, dip your (clean and dry) pointer finger in the mixture and rub into your thumb - you shouldn't feel any granules. If you do, beat again and repeat test until the sugar has dissolved. If the sugar doesn't dissolve properly, it might leak from the pavlova during the cooking process.
TIP: Take care not over-beat. More beating doesn't equal a better or fluffier pavlova. Instead, focus on achieving that thick and glossy mixture with a smooth texture – and then stop beating!
Stir in the vanilla and vinegar
We're done with the mixer so scrape the mixture from the whisk or beater with your spatula and remove the mixing bowl from the stand mixer. Add the vanilla extract and vinegar to the mixture and fold in with the spatula until combined (see image 4).
Shaping the pav
Carefully scrape the mixture out of the mixing bowl and onto the prepared tray into a small, round pile (see image 5). Use the spatula to shape the mixture into a circle about 18cm in diameter. Flatten out the top of the pavlova using the spatula (see image 6) and then use the spatula to brush up the sides of the pavlova on a slight inwards lean (say 20 degrees) (see image 7). This will create a slightly domed effect and slightly concave top – helping with the stability of your pavlova. Tap the top of the pavlova gently with the spatula to create a few peeks in the mixture (see image 8).
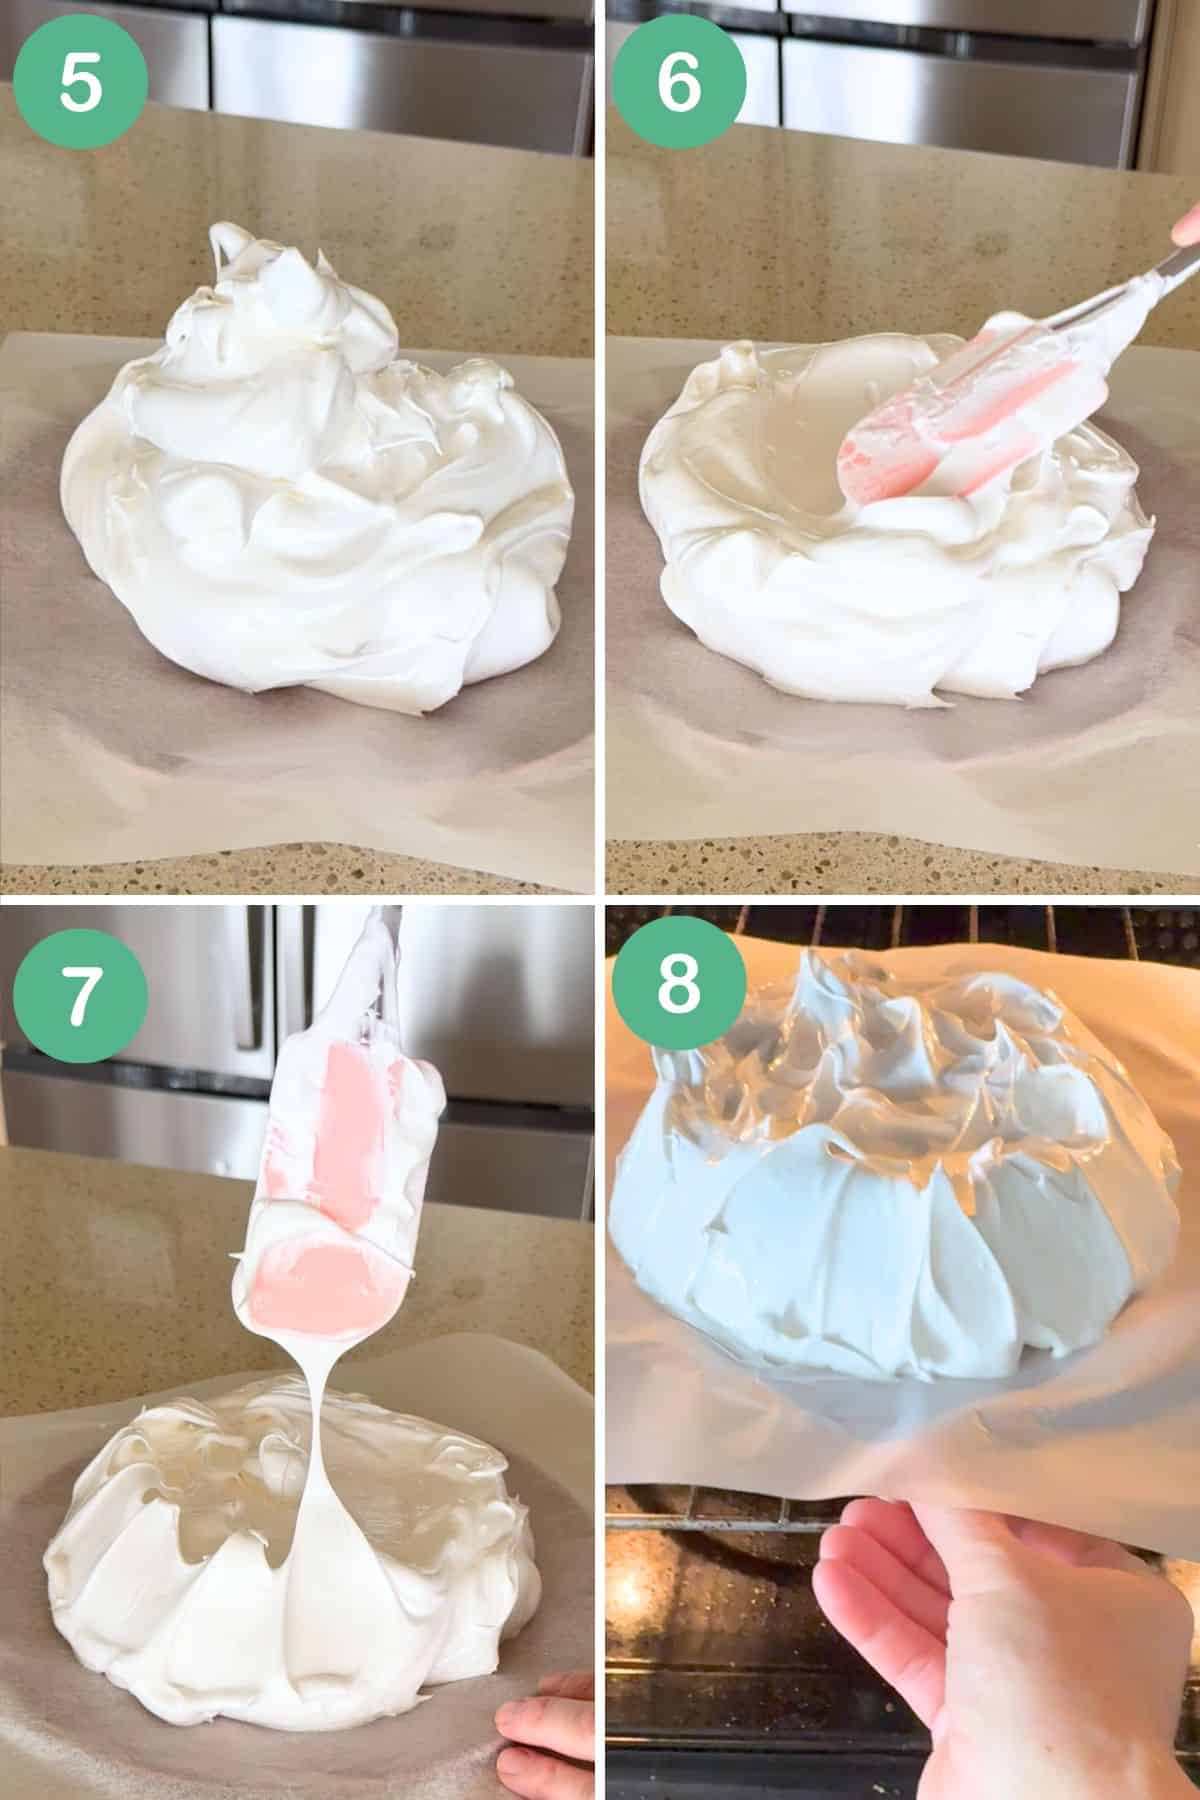
Baking
Place the pavlova in the pre-heated oven (see image 8) and cook for 15 minutes before reducing the oven temperature to 100 degrees celsius /210 degrees fahrenheit (fan-forced) and cooking for another 60 minutes. Your pavlova will change from a white colour to a cream colour during this time.
Cooling
This bit is important. Turn the oven off after cooking time elapses but DO NOT open the oven door. Leave the pavlova to cool in the oven for at least 6 hours, preferably overnight.
Once completely cool, remove from the oven.
Decorating
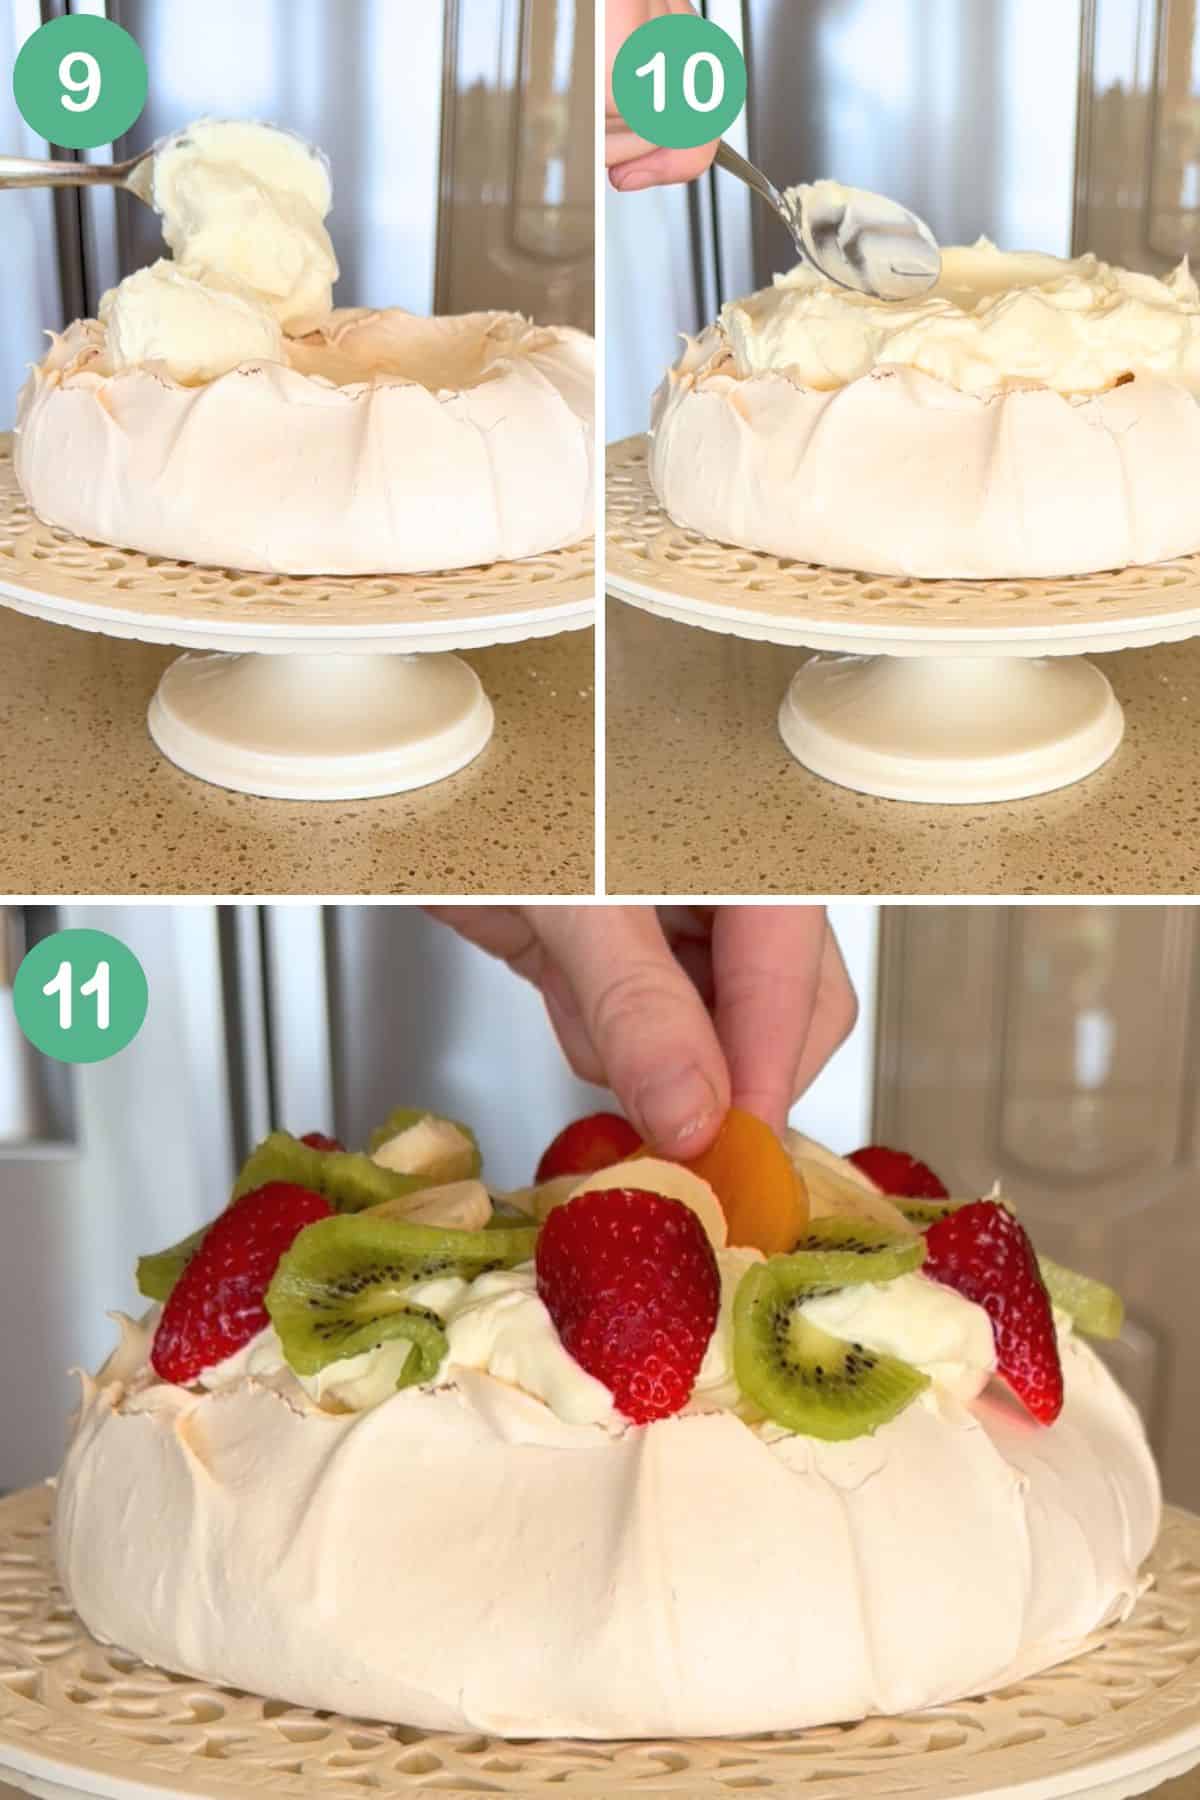
It can be tricky to remove the pavlova from the baking paper. It's a super delicate dessert. If you're new to this, perhaps just leave it on the baking paper and place on serving tray before trimming the paper. If you're feeling confident, you can remove the pavlova from the baking paper using a metal spatula to release the pavlova from the paper and then pulling the paper out from underneath the pavlova (rather than trying to lift the delicate pavlova).
I recommend decorating with whipped cream and fruit just before serving – ideally, no more than 4 hours before serving.
Beat the cream until soft peaks form. Add the icing sugar and beat again to combine. Spoon the cream – very gently – over the top of the pavlova. Smooth out the cream a little (again, very gently because you don't want to cause a collapse at this late stage) (see images 9 and 10).
TIP: Avoid overbeating as cream that is too stiff is harder to spoon onto the pavlova without crushing it.
Scoop out passionfruit pulp and cut the rest of the fruit into slices/pieces. Arrange over top of cream (see image 11).
You've done it! Enjoy a slice – ice cream optional.
Storage
You should make your pavlova the day before and then store it in the oven to completely cool (and an airtight container once cooled.) Ideally, decorate it no more than a 4 hours before serving.
Store decorated pavlova in the fridge and enjoy leftovers (if there are any) the next day. Pavlova isn't suitable for freezing.
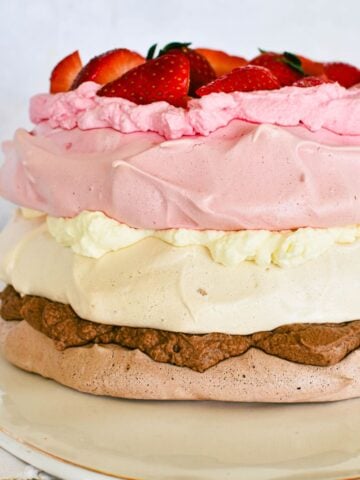
Variation Ideas
- Use banana, berries, figs or any other fruit you fancy
- Add some flavouring to the whipped cream
- Sprinkle some shaved chocolate or dust with icing sugar.
- Try one of these recipe variations:

Recipe FAQs
I find whites that I've frozen and thawed out or whites that have been separated out and left in the fridge for a day work every bit as good as fresh egg whites.
In terms of the freshness of the egg, use fresh eggs but not eggs that were laid in the last few days.
If it's just a few cracks, that's fine. Expect a few cracks. However, make sure you leave your pavlova in the oven to cool if there are a few too many cracks. Also, be sure not to make the cream for decorating too stiff or it will be harder to decorate without causing even more cracks. Use the cream when decorating to hold the existing cracks together.
Your oven is too hot. Try turning it down a little next time.
There are several reasons why your pavlova may collapse.
First, you may not have whipped the eggs and sugar well enough. Make sure you achieve the thick, glossy mixture and rub a little between your fingers to make sure the sugar is dissolved. If you open the oven door too soon after it's cooked, you also risk a collapsed pavlova. For the time being, though, just add the cream and fruit – it'll taste just fine.
More iconic Aussie recipes
If you're looking for more classic Aussie flavours, check out my entire Aussie recipe collection or jump straight to one of these favourites:
Made this recipe and love it? Please take a moment to rate the recipe and leave a comment below. It’s such a help to others who want to try the recipe. (And it really makes my day to hear how Nana Ling's recipes are being made, shared and loved all around the world! - Libby x)
For more fun and deliciousness in the kitchen, follow along on Facebook, TikTok and Pinterest, and subscribe for new posts via email.
Pavlova Recipe
Equipment
- baking tray (a round pizza tray or bottom of a round springform cake tin works well)
- stand mixer and whisk attachment (ensure bowl is clean and dry) (you can use handheld electric beaters, but a stand mixer is preferred)
- silicone spatula (clean and dry)
Ingredients
Pavlova
- 4 egg whites (from 60 gram eggs) (150ml egg white in total) (at room temperature - see notes below for more information on eggs)
- 1 pinch salt (table or fine grain salt)
- 1 cup caster sugar / superfine sugar (210 grams)
- 1 teaspoon vanilla extract
- 1 teaspoon white vinegar
Whipped cream
- 300 ml thickened cream / heavy cream
- 1 tablespoon icing sugar / powdered sugar
Fruit topping
- 5-7 strawberries
- 5 slices tinned peach
- 1 passionfruit
- ½ kiwifruit
- ½ banana
Instructions
Pavlova
- Preheat oven to 130 degrees celsius / 265 degrees fahrenheit (fan-forced)
- Line baking tray with baking paper.
- Beat egg whites and salt until the mixture forms soft peaks. (Start beating on low speed and then increase to med-high speed. This should take 2-3 minutes)
- Reduce speed to low-med and add sugar gradually (break into about 6 parts and add over 2 minutes).
- Once all sugar is added, increase speed to med-high speed until the mixture becomes thick and glossy, holds its shape well and sugar has dissolved. This should take about 2-4 minutes. Once ready, dip your (clean and dry) pointer finger in the mixture and rub into your thumb - there should be no granules. If there is, beat again and repeat test until sugar has dissolved.
- Scrape the mixture from the whisk or beater and remove the mixing bowl from the stand mixer. Add the vanilla extract and vinegar and fold in with a spatula until combined.
- Carefully scrape the mixture out of mixing bowl and onto the prepared tray and use spatula to shape the mixture into a circle about 18cm in diameter. Flatten out the top of the pavlova using the spatula and then use the spatula to brush up the sides of the pavlova on a slight inwards lean (say 20 degrees). This will create a slightly domed effect and slightly concave top. Tap the top of the pavlova gently with the spatula to create a few peeks in the mixture.
- Place pavlova in oven and cook for 15 minutes before turning oven down to 100 degrees celsius / 210 degrees fahrenheit (fan-forced) and cooking for another 60 minutes.
- Turn oven off after cooking time elapses but DO NOT open the oven door. Leave the pavlova to cool in the oven for at least 8 hours, preferably overnight.
- Once completely cool, remove from the oven.
Decorating
- You can remove the pavlova from the baking paper (use a metal spatula to release the pavlova from the paper and pull the paper out from underneath the pavlova rather than trying to lift the delicate pavlova) or leave it on the baking paper and place on serving tray before trimming the paper.
- Decorate with whipped cream and fruit just before serving.
- Beat the cream until soft peaks form. Add the icing sugar and beat again to combine. Spoon the cream (gently) over the top of the pavlova and smooth out the top ready for decorating.
- Scoop out passionfruit pulp and cut the rest of the fruit into slices/pieces. Arrange over top of cream.
Notes
-
- EGGS: separate whites from yolks while eggs are still cold (it's easier to ensure no yolk is in the whites) but leave whites out to come to room temperature before beating.
- REDUCING OVEN TEMP: There is a temperature drop during the cooking process, so make sure to set an alarm.
- COOL IN OVEN: once you switch off the oven, leave pavlova in there to gradually cool – it'll need at least 6 hours, preferably leave it overnight.
- MAKE TWO: I don't recommend increasing the quantities to make a larger pavlova. Make two instead!
- BANANA: If adding sliced banana (it's a bit old-fashioned but my nan always added it and I still love it), squeeze a little lemon juice over to stop it going brown.
Paul says
I always see recipes with cornflour and ask why? They are better without!
I've been working on as simple as possible and did this recipe here but without the salt and only 50 minutes on 180 down to 150. Waited 20 mins in the oven to cool and then 20 minutes out.(Though would take longer in summer). Worked perfect!
Libby Hakim says
Wonderful! Thanks for the feedback, Paul 🙂
Angela says
Hello,
I am just wanting clarification of the temperatures.
Is the preheat 130 (fan forced) which is equivalent to 150 C non-fan?
Likewise when the temperature is turned down to 100 C fan forced therefore 120C non-fan?
Looking forward to hearing from you.
Regards, Angela
Libby Hakim says
Hi Angela. It really depends on the oven. The guide is generally 20 degrees up for non-fan, however these days I find it's closer to 10 degrees. I'd try that first with pavlova. Good luck!
Sharon says
Scrapping up to 50cm ???
Libby Hakim says
haha - I just mean to get the right angle! Not to actually make the mixture reach up 50cm (that'd be a tall pav!!) Perhaps I'll find a way to re-phrase that. Thanks, Sharon 🙂
Jayne says
I am very new to baking despite being in the wrong side of 50! I was terrified of making a Pavlova but followed your recipe and instructions to the letter and it was a real success, crisp but not too crisp on the outside and soft and fluffy marshmallow on the inside so a big thank you from Belfast, Northern Ireland. I really wish I could upload a picture.
Libby Hakim says
Amazing! Thanks so much for your review and rating, Jayne. I love this recipe and it's wonderful to hear people from (very, very) afar enjoying Nana Ling's recipes. I'd love to see the picture - you can tag me on Instagram @cookingwithnanaling, find me on Facebook or email hello@cookingwithnanaling.com. Enjoy x
Elizabeth says
I have decorated one with strawberries and raspberries marinated in a small amount of rose water, sprinkled with pistachio slivers and topped with Persian Fairy Floss it looks spectacular! Extra Persian Fairy Floss in a bowl on the table, as it’s sure to go!
Libby Hakim says
Hi Elizabeth. Sounds amazing! Would be perfect for a birthday or Christmas. Thanks for your suggestions 🙂
Sandra says
How do you make a pavlova that isn’t soft inside - more crunchy, similar to the little store bought ones.
Libby says
Hi Sandra. Those little store bought ones are more like meringues than pavlova. From what I understand, you just use egg whites and sugar to make these - omit the rest of the ingredients. And you would probably cook them a little longer (though if you're making small shells you'd have to reduce time to take account of size too). I don't have a meringue recipe on the site (yet) - sorry - but you could try the pav recipe like I've suggested. Good luck!
Brenda Brazendale says
I am 84 years old and Nana Ling’s pavlova is very similar to the one I have always made but using 6 egg whites, 1-1/2 cups caster sugar, 1 teaspoon vanilla essence, pinch salt, 2 teaspoons white vinegar and 1 dessertspoon cornflour. Only difference really is the cornflour. I beat 3/4 of the sugar in when the egg whites have started peaking and then I fold remainder of sugar plus cornflour (combined) in right at the end. Yes, old recipes certainly still have an important place in our cooking! You
Libby says
Hi Brenda. Thanks so much for sharing your recipe. It's always lovely to hear from people who are using the recipes and looking over the website. The old recipes are definitely something to hang on to and it just feels comforting to know that we are following recipes that were part of the lives of our mothers, grandmothers, great grandmothers and so on. Libby x
Sylvie says
Such a classic dessert, and I loved reading its history! Thanks for all the great tips to make pavlova too 🙂
Libby says
Hi Sylvie. Thanks for your lovely comments. Pavlova does indeed have an interesting history and is one of my most-loved sweets. Thanks again for commenting (and I'm loving following your blog - your photography is wonderful). Libby x