
Is there any dessert as regal as the Victoria Sponge Cake?
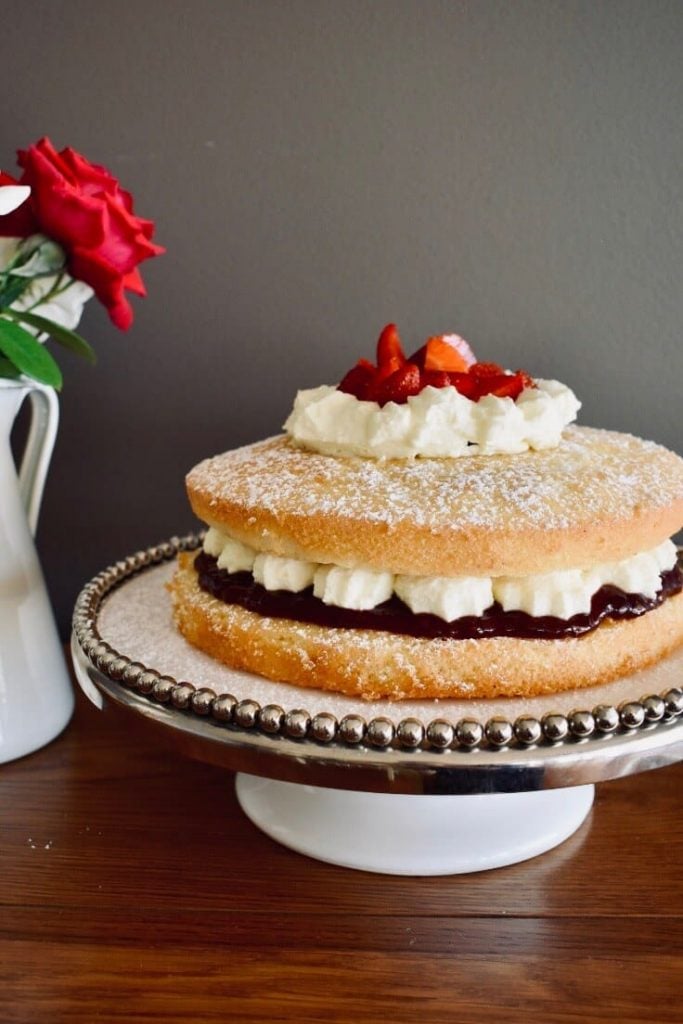
Perched on a cake stand, with a jam and cream filling and icing sugar dusting , the Victoria Sponge is a quintessential afternoon tea treat.
I've added some strawberries and cream on top of the sponge here, though traditionally the Victoria Sponge is simply dusted with icing sugar.
The Queen of sponge cakes
The Victoria Sponge is, of course, named after Queen Victoria, Queen of the United Kingdom of Great Britain and Ireland from 20 June 1837 until her death on 22 January 1901.
Nana Ling would have been 13 years old when Queen Victoria died. She would have then seen four Kings take the Crown followed by Queen Elizabeth II, who has now reigned for 67 years.
If you've watched the BBC series, Victoria, you may have fallen for Queen Victoria as portrayed by the lovely Jenna Coleman.
Queen Victoria was equally loved in her own time, too. On her death, Australian newspapers carried stories of worldwide mourning and one article in The Sydney Morning Herald included this lovely line about the queen:
"Her marked consideration for others has been been her passport to many hearts."
Queen Victoria: Queen of hearts and Queen of sponge cakes!
The ingredients: Victoria Sponge Cake
You'll need these ingredients to whip up this cake:
- caster sugar
- eggs
- SR flour
- butter
- boiling water
- thickened cream
- strawberry jam
- strawberries.
Keep scrolling to the recipe card at the bottom of this post for the precise amounts of each ingredient.
Making Victoria Sponge Cake
The step-by-step instructions are also included in the recipe card at the bottom of this post, however I'll run through some of the key steps here.
If you are scared of sponge cakes or haven't had much luck with sponge recipes in the past, I totally understand– I've been there.
The important thing to remember with this recipe is to gently fold in everything after you beat the egg and sugar. Don't overbeat. Treat the mixture like it's very delicate.
You can also double sift the flour to make it easier to blend the flour into the mixture.
Don't open the oven door during cooking. If you open the door at the end of the suggested cooking time and you hear the cakes still sizzling loudly, quickly shut the door.
When cooked, the volume of the sizzling decreases quite dramatically.
I also check by pressing the top of the cake gently with the flat of my fingers. A cooked cake should spring back.
Finally, if you really want to impress with this cake, make your own strawberry jam to use as a filling. Or mix things up a little with homemade grape jam.

Enjoying your Sponge
Store your Victoria Sponge in the fridge. It's best eaten fresh or the next day, though it should keep a few days in the fridge.
Nana Ling's original Victoria Sponge recipe
Keep scrolling for the tested and tweaked version.
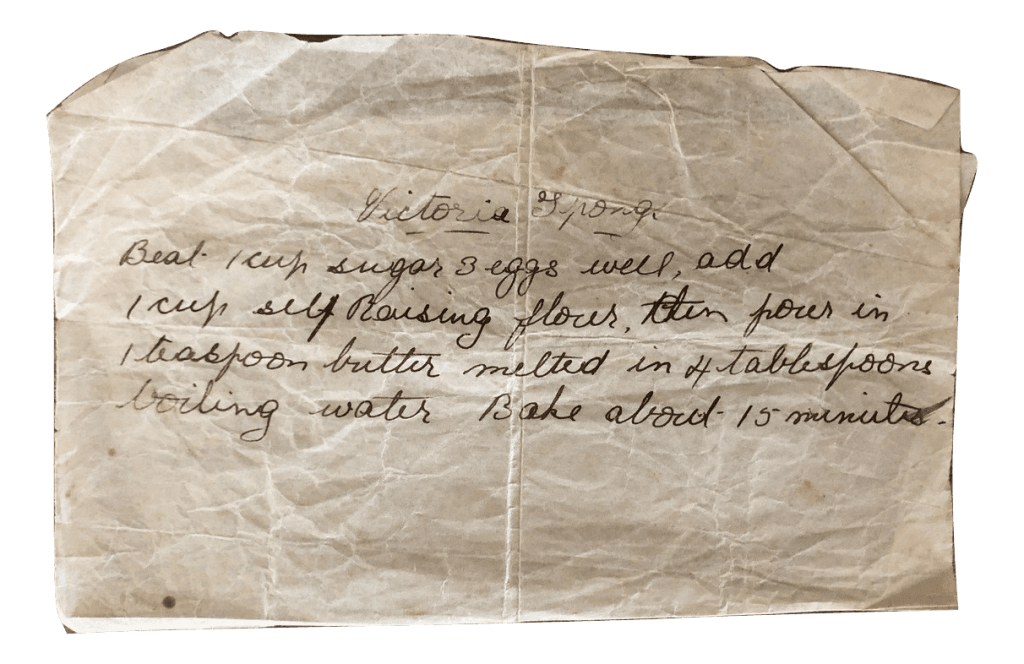
Victoria Sponge
Ingredients
- 1 cup caster sugar
- 3 eggs
- 1 cup SR flour
- 1 tablespoon melted butter
- 4 tablespoons boiling water
Decorating
- 300 ml thickened cream
- ⅓ cup strawberry jam
- ½ punnet chopped strawberries
Instructions
- Preheat oven to 180 degrees celsius (fan-forced).
- Grease 2 round cake tins (of about 20cm diameter) and then line with baking paper.
- Beat eggs and sugar well in a stand mixer.
- Add flour and fold gently with a spatula to combine.
- Add melted butter and water and combine gently using a spatula. If flour lumps remain, whisk gently until the mixture is smooth.
- Bake in oven for 12-15 minutes.
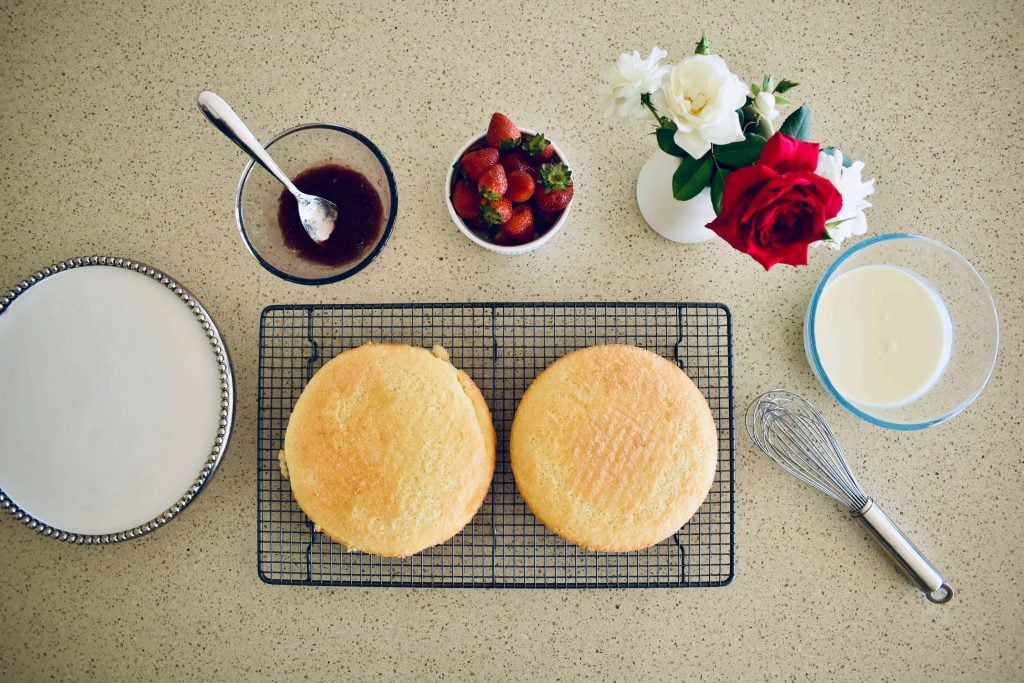
- Leave to cool in cake tin for a few minutes before turning out onto a cooling rack.
- When cool, spread jam on one cake and then spoon or pipe whipped cream on top of jam.
- Place second cake on top to make a sandwich.
- Dust cake with icing sugar and then decorate top of cake with chopped strawberries and remaining cream.

Audrey says
Before I attempt this, the original recipe calls for 1 teaspoon...not tablespoon. Which is correct?
Libby says
Hi Audrey. I sometimes tweak the original recipe and have done so here. The cooking time is also slightly adjusted. The recipe card is my "tried and tested" version. Of course you could always try the original recipe, too. However, I found the adjusted recipe to work better for more modern tastes, ovens etc. Good luck! 🙂